
Pre-requisites for Monitoring Components in an Agentless Manner
When deploying a remote agent, it is essential to ensure that the remote agent can communicate using multiple agentless mechanisms (see Figure 1) with the target environment (appropriate firewall rules must be configured for this purpose).
The sub-sections below describe the pre-requisites that need to be fulfilled to enable agentless monitoring of different types of applications.
General Pre-requisites
- At least one remote agent should be available for performing agentless monitoring. By default, the eG agent on the eG manager host serves as both a remote agent and external agent for the environment. If required, you can configure more remote agents. For this purpose, you can follow the procedure detailed in Configuring Additional Remote Agents.
- If you intend to use SNMP for monitoring a component in an agentless manner, then make sure that the SNMP port 161 is opened on the target component.
Pre-requisites for Monitoring a Windows System/Application in an Agentless Manner
For monitoring a Microsoft Windows environment in an agentless manner, the following requirements should be fulfilled:
- The udp ports 137 and 138 and the tcp ports 139 and 445 should be opened on the target Windows sytem to enable the remote agent to communicate with that system.
-
Ideally, the remote agent should be installed and running with the permissions of a domain administrator. To ensure this, do the following before starting a remote agent:
-
Open the Serviceswindow. For this, first open the Control Panel on the Windows system hosting the eG agent (see Figure 1).
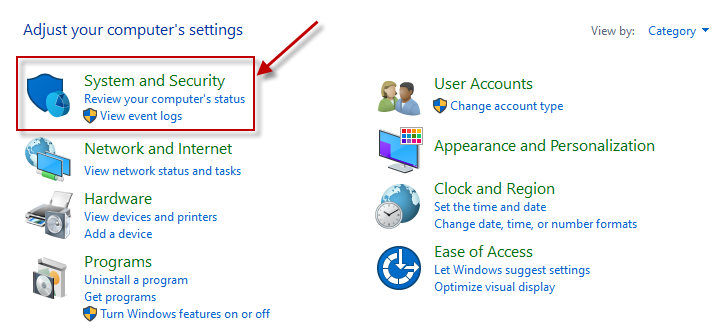
Figure 1 : The Control Panel of the Windows system hosting the eG agent
-
Click on the System and Security option in Figure 1. This will open Figure 2. Here, select the Administrative Tools option (as indicated by Figure 2).
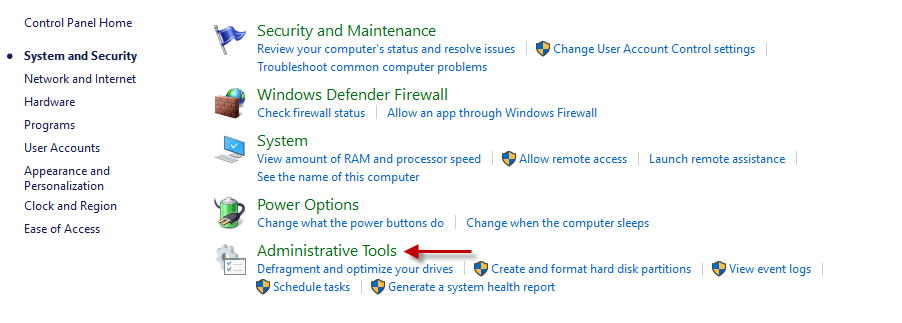
Figure 2 : Clicking on the Administrative Tools option under System and Security
-
When Figure 3 appears, click on the Component Services option (as shown by Figure 3).
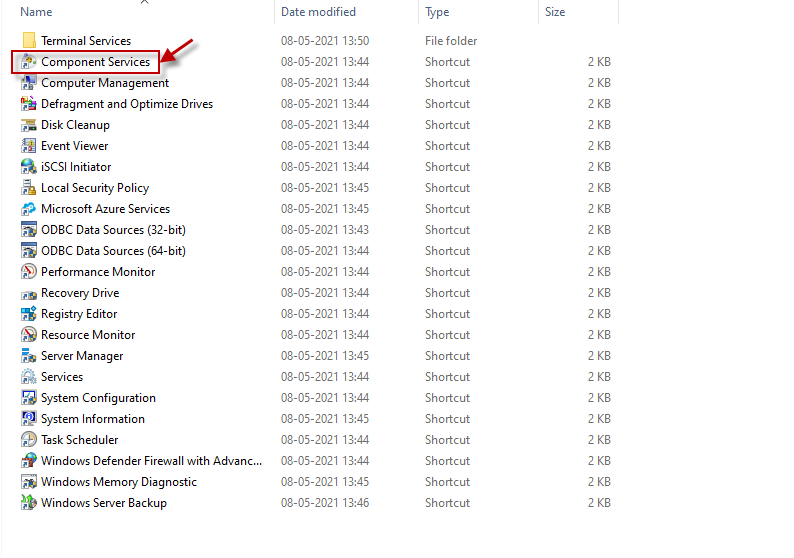
Figure 3 : Clicking on the Component Services option under Administrative Tools
-
This will invoke Figure 4. If you click on the Services (Local) node in the left panel of Figure 4, you will see a list of services displayed in the right-panel.
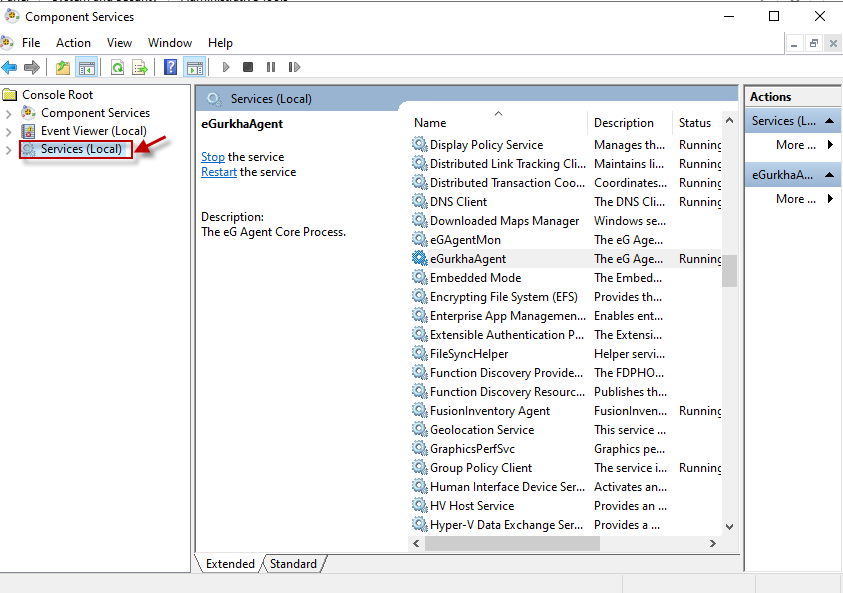
Figure 4 : Viewing the list of services in the Component Services window
-
Keep scrolling down the service list that you see in Figure 4 until the eGurkhaAgent service becomes visible. Now, right-click on that service and select the Properties option (see Figure 5).
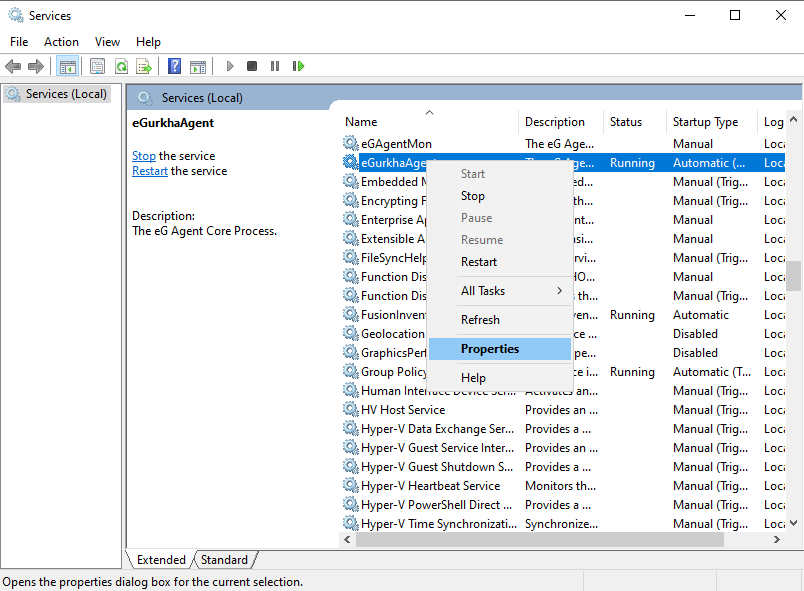
Figure 5 : Choosing the view the Properties of the eGurkhaAgent service
-
When the Properties dialog box appears, click on the Log On tab page therein (see Figure 6).
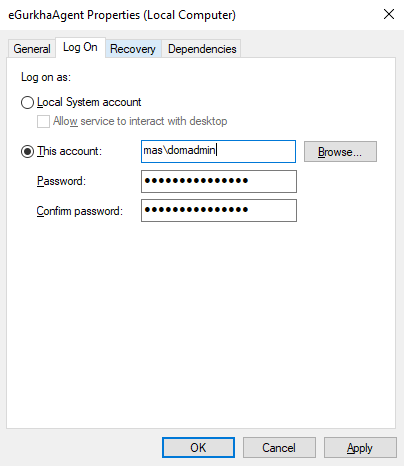
Figure 6 : Selecting properties from the eGurkhaAgent service’s shortcut menu
-
Then, choose the This account option from the Log on as section of Figure 6
- Finally, click the Apply button in and then the ok button to register the changes (see Figure 6).
-
Hence, typically, at least one remote agent is necessary for each independent domain being monitored.
Note:
-
In high security environments, administrators may not prefer to have the eGurkhaAgent service run with domain administrator privileges. In such environments, administrators can configure the eGurkhaAgent service to run using the credentials of a user who has rights to login to every Windows system in the domain or at least to those systems that are to be monitored. Note that in this case the user account should be Allowed to logon locally. Also, note that this approach will work only if the remote agent and the target Windows host are in the same domain.
-
If the remote agent is within a domain, but the target host operates out of the domain or within a workgroup, then perform the following broad steps to ensure that the remote agent monitors the host:
- Create a new user on the target host and assign local administrator privileges to that user.
- Create a new user on the remote agent’s host with the same credentials as the user created on the monitored host; assign local administrator privileges to this user also.
- Ensure that the remote agent runs with the permissions of this new user.
-
-
-
Ensure that the target Windows system consists of the default share named admin$. If this share does not exist on a target, then the remote agent will not be able to connect to that system or collect metrics from it. To check whether admin$ pre-exists, do the following:
- Login to the target system and go to the command prompt.
- Type the command net share; this command will list all the default and user-configured shares on the system
- If admin$ is not listed, it is a definite indicator that the system does not consist of the admin$ share.
The way forward is to manually configure the admin$ share on the target system. To do so, issue the command net share admin$ from the command prompt of the system. This will create the admin$ share.
-
Also, the remote agent connects to the Windows host to be monitored using NetBIOS - a protocol that allows applications on different computers to communicate within a local area network. If NetBIOS is not enabled on a Windows host, then eG Enterprise cannot monitor that host in an agentless manner.
To enable NetBIOS on a Windows host, follow the steps given below:
- Login to the target Windows host and open its Control Panel (see Figure 7).
-
In Figure 7, click on the Network and Internet option.
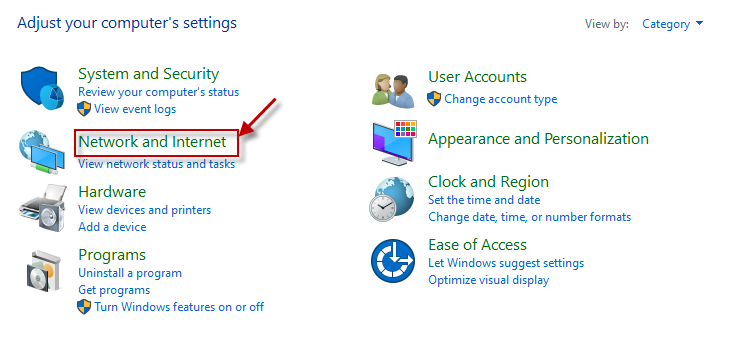
Figure 7 : Selecting the Network and Internet option from the Control Panel
-
This will open Figure 8. Click on the Network and Sharing Center option in the right panel of Figure 8.
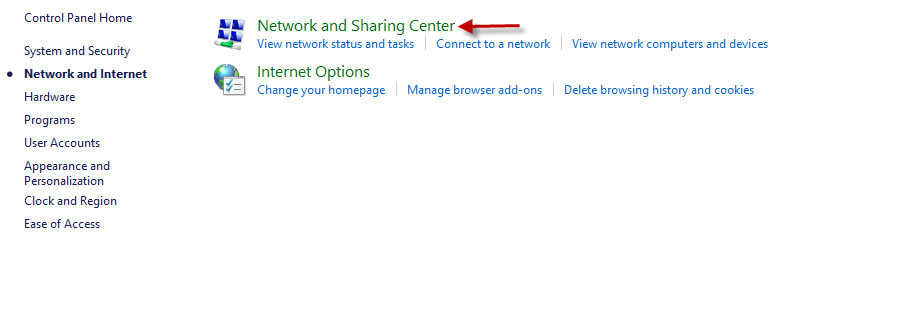
Figure 8 : Clicking on the Network and Sharing Center option
-
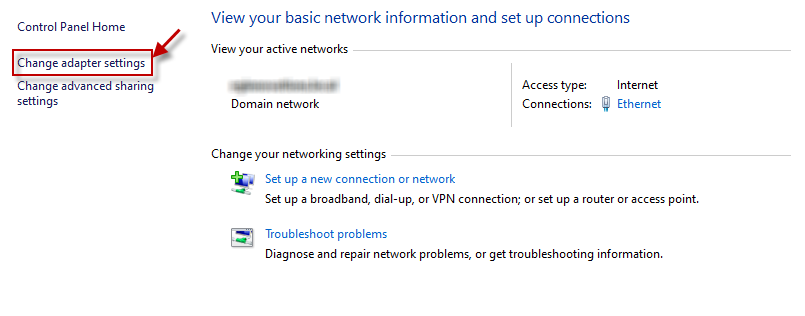
When Figure 9 appears, click on the Change adapter settings option in the left panel of Figure 9 to change the properties of your local area connection.
-
This will open Figure 10. Right-click on the local area network connection displayed in Figure 10 and pick the Properties option from the menu that pops out.
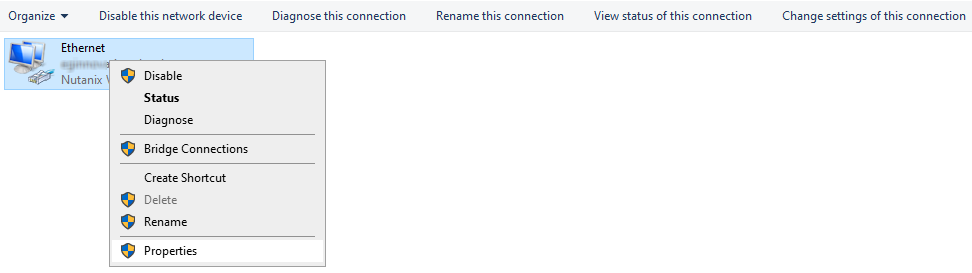
Figure 10 : Choosing to view/edit the Properties of the local area connection
-
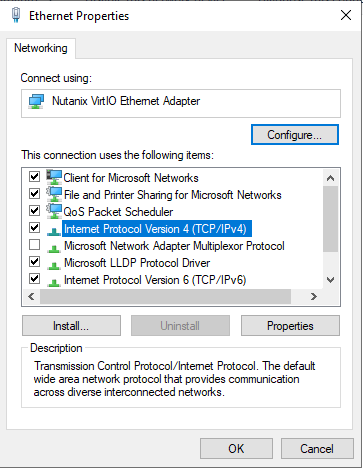
Figure 11 that appears next displays the properties of the Local Area Connection. Double-click on the Internet Protocol Version 4 (TCP/IPv4) option indicated by Figure 11 to view its properties.
-
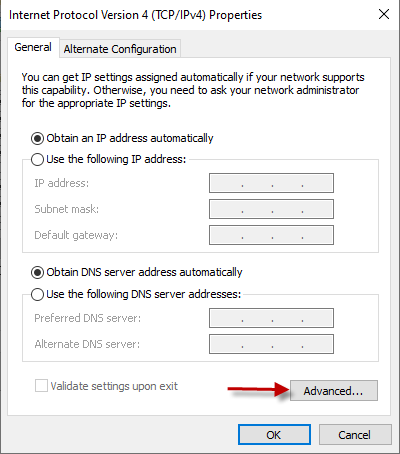
Click on the Advanced button within the General tab of the Properties dialog that appears next.
-
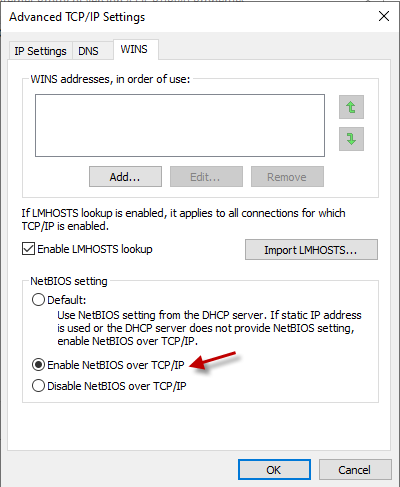
Click on the wins tab of the Advanced TCP/IP Settings dialog box, and select the Enable NetBIOS over TCP/IP option within. Finally, click the ok button therein to register the changes.
- Additionally, to remotely monitor a Windows host in particular, you need to start the Remote registry service.
-
By default, remote Windows systems/applications are monitored using Perfmon. To ensure that the remote agent is able to collect metrics from the target Windows systems using Perfmon, the following pre-erquisites should be additionally fulfilled:
- PerfMon should have at least READ access to the Perflib\LanguageID subkey on the remote computer (which allows external access to PerfMon). The Perflib\LanguageID subkey is located in the following Registry path: HKEY_LOCAL_MACHINE\Software\Microsoft\WindowsNT\CurrentVersion\Perflib\LanguageID. The LanguageID is a numeric code for the spoken language of the installed operating system. A computer with a LanguageID of 009 (the English LanguageID) has the following Perflib\Language subkey: HKEY_LOCAL_MACHINE\Software\Microsoft\Windows NT\CurrentVersion\Perflib\009
- The Disk Performance Statistics Driver (diskperf) should exist on the target computer; allow READ access explicitly to the user account for the following registry key and all subkeys: HKEY_LOCAL_MACHINE\SYSTEM\CurrentControlSet\Services\Diskperf
-
The monitored computer should be able to connect to IPC$. The following registry entry enables connecting to IPC$:
- Hive: HKEY_LOCAL_MACHINE\SYSTEM
- Key: CurrentControlSet\Services\LanmanServer\Parameters
- Name: AutoShareWks
- Type: REG_DWORD
- Value: 1
- At least READ access should be granted to the following registry subkey (allowing it to remotely connect to the Windows registry): HKLM\SYSTEM\CurrentControlSet\Control\SecurePipeServers\winreg. This permission determines who can remotely connect to a registry. If this subkey does not exist, all users can remotely connect to the registry. To remotely connect to a registry, a user must have at least READ access to the winreg subkey on the target computer.
-
At least READ access should be granted to the following registry keys on the remote computer:
- HKEY_LOCAL_MACHINE\SYSTEM\CurrentControlSet\Control\SecurePipeServers\winreg
- HKEY_LOCAL_MACHINE\SOFTWARE\Microsoft\WindowsNT\CurrentVersion\Perflib
Pre-requisites for Monitoring a Unix System/Application in an Agentless Manner
For monitoring Unix systems/applications in an agentless manner, ensure that the pre-requisites outlined below are fulfilled:
- By default, the remote agent communicates with a target Unix system via Rexec. In this case, make sure that port 512 is opened on the target to enable this communication. If SSH is the mode of communication between the remote agent and target system, then make sure that port 22 is opened on the target.
- If you want the remote agent to connect to a target host via Rexec, then make sure that the rexecd daemon on the target host is started. This daemon provides the server function for the rexec command. To check the status of this daemon, open the /etc/inetd.conf file on the target host and look for the rexecd line in it. If this line is uncommented, it indicates that the daemon has been started. If the line is commented, then it indicates that the daemon has not been started. In this case, uncomment the line, save the inetd.conf file, and then run the refresh -s inetd command or the kill -1 InetdPID command to inform the inetd daemon of the changes to its configuration.
-
If you want the remote agent to communicate with a target host via SSH, then you should also pick an encryption type/mode for the SSH connection. The options here are: Password authentication and Key-based authentication.
If you want the SSH connection to use the Password Authentication mode, then, first make sure that Password Authentication is enabled on the target host. For this, follow the steps below:
- Login to the Unix host to be monitored.
- Edit the sshd_config file in the /etc/ssh directory.
- Check whether the Password Authentication flag in the sshd_config file is set to no. If so, set it to yes.
- Then, save the file and restart/signal the SSH daemon (eg., using kill -1 <sshd pid>)
If you want the SSH connection to use the Key-based Authentication mode instead, then first make sure that Key-based authentication is enabled on the target host. For this purpose, you will require a public/private key pair. A public/private key pair is available in the /opt/egurkha/agent/sshkeys/ directory of the eG agent. While the private key is available in the file named id_rsa, the public key is contained within the file authorized_keys. The pass phrase associated with the default private key is eginnovations. You now have the option to proceed with the default keys or generate a different key pair.
If you decide to go with the keys bundled with the eG agent, do the following:
- To enable key-based authentication, the private key should remain in the /opt/egurkha/agent/sshkeys/ directory of the eG agent, and the public key should be copied to the remote Unix host to be monitored. To achieve this, first login to the Unix host to be monitored as the eG user.
- Create a directory named .ssh in the <USER_HOME_DIR> on the host using the command: mkdir ~/.ssh.
- Next, copy the authorized_keys file from the /opt/egurkha/agent/sshkeys/ directory on the eG agent host to the <USER_HOME_DIR>/.ssh directory on the Unix host. Make sure that the permission of the .ssh directory and the authorized_keys file is 700.
On the other hand, if you want to generate a new key pair, then do the following:
- Login to the Unix host to be monitored as an eG user.
-
From the <USER_HOME_DIR>, execute the command: ssh-keygen -t rsa. Upon executing the command, you will be requested to specify the full path to the file to which the key is to be saved. By default, a directory named .ssh will be created in the <USER_HOME_DIR>, to which the key pair will be saved. To go with the default location, simply press Enter.
Generating public/private rsa key pair.
Enter file in which to save the key (/home/egurkha/.ssh/id_rsa): -
Next, you will be prompted to provide a pass phrase. Provide any pass phrase of your choice.
Enter passphrase (empty for no passphrase): eginnovations
Enter same passphrase again: eginnovations -
If the key pair is created successfully, then the following messages will appear:
Your identification has been saved in /home/egurkha/.ssh/id_rsa.
Your public key has been saved in /home/egurkha/.ssh/id_rsa.pub.
The key fingerprint is:
09:f4:02:3f:7d:00:4a:b4:6d:b9:2f:c1:cb:cf:0e:e1 dclements@sde4.freshwater.com - The messages indicate that the private key has been saved to a file named id_rsa in the <USER_HOME_DIR>/.ssh, and the public key has been saved to a file named id_rsa.pub in the same directory. Now, rename the id_rsa.pub file as authorized_keys.
- Then, to enable key-based authentication, login to the eG agent host.
- Copy the id_rsa file from the <USER_HOME_DIR>/.ssh directory of the target Unix host to the <EG_INSTALL_DIR>\agent\sshkeys directory on the eG agent host.
-
Finally, log into target Unix host once again (as the eG user) and lock the file permissions down to prevent other users from being able to read the key pair data, using the following commands:
chmod go-w ~/
chmod 700 ~/.ssh
chmod go-rwx ~/.ssh/*
