
Creating a New Role
By default, eG Enterprise is capable of monitoring the target AWS Cloud using either AWS Secret key approach or Role based approach. In a Role based approach, the eG agent uses the AWS Role and AWS Account ID to pull the required metrics from the target AWS Cloud. This approach is more secure and convenient for the administrators who are required to change the AWS Access Key and AWS Secret Key frequently, owing to security mandates from Amazon. In order to use the Role based approach to monitor the target AWS Cloud, you need to create a special role for monitoring purpose on the AWS Cloud. The AWS role can be created either manually or automatically.
Automatic Creation of AWS Role
eG Enterprise recommends automatic creation of AWS Role. To achieve this, eG Enterprise offers a specialized URL that is built out of a standard CloudFormation template. By accessing this URL, administrators can execute the CloudFormation template and create an AWS Role without having to navigate across multiple screens in the AWS IAM console.
To create an AWS Role automatically, do the following:
-
Copy and paste the URL specified below in any browser in your target environment:
https://us-east-1.console.aws.amazon.com/cloudformation/home?region=us-east-1#/stacks/quickcreate?templateUrl=https%3A%2F%2Feg-innovations.s3.amazonaws.com%2FRole-Creation.yml&stackName=eG-IntegrationStack¶m_ExternalId=eG-Monitoring¶m_RoleName=eG-IntegrationRole
-
The login page of AWS will then appear. Login to the AWS console as a user with administrator privileges.
-
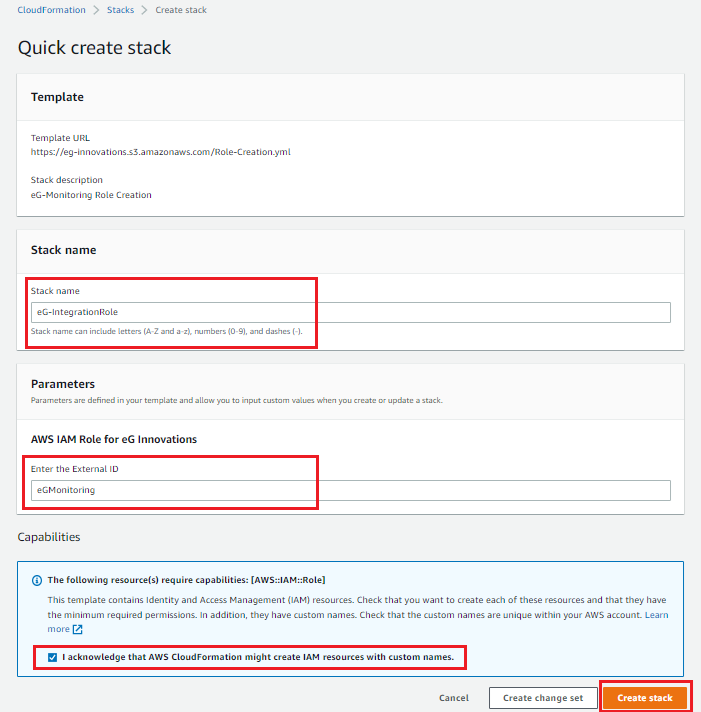
Figure 1 will then appear. The Stack name text box will be auto populated with the name of the Role that is to be created and the Enter the External ID text box will be auto populated with the Nickname of the AWS Cloud component that is to be monitored.
-
Ensure that you select the check box preceding the I acknowledge that AWS CloudFormation might create IAM resources with custom names field (see Figure 1) and click the Create stack button.
-
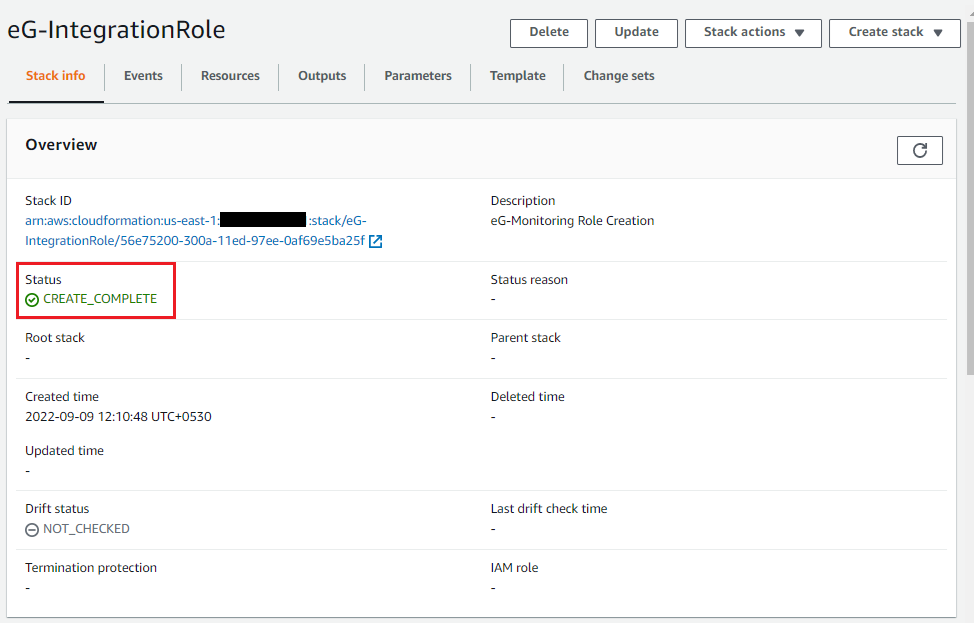
The stack will then be created and Figure 2 will then appear with the Stack name. Here, ensure that the Status of the stack is displayed as CREATE_COMPLETE.
-
Then, navigate to the Outputs tab. Figure 3 will then appear.
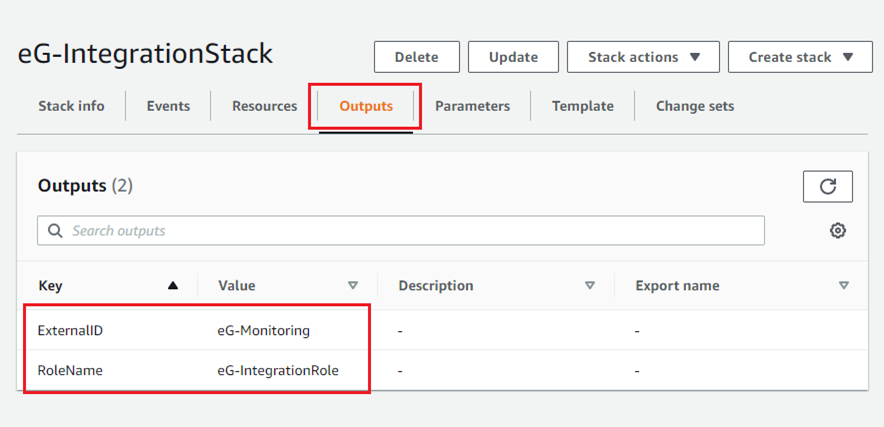
Figure 3 : Navigating to the Outputs tab
Here, the ExternalID and the RoleName will be displayed. Note down these parameters. Ensure that you specify the ExternalID against the Nickname field while you manually add the AWS Cloud component to eG Enterprise. The RoleName should be specified against the AWS ROLE NAME parameter while you configure the tests pertaining to AWS Cloud component.
Manual Creation of AWS Role
In a Role-based monitoring approach, you create a trust relationship between the customer’s AWS Account (i.e., target AWS Cloud to be monitored) and AWS Account of eG Innovations and use IAM Roles for secure access.
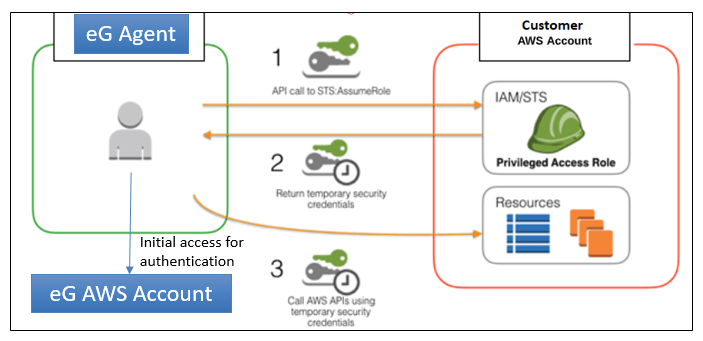
Figure 4 : How trust relationship works in a Role based monitoring approach?
From Figure 4 you can infer the following:
-
Cross-account roles can be used to give access to resources from other AWS accounts.
-
The IAM policy will govern what type of access will be given to the role.
-
This is more secure than giving Access Keys for accessing the resources.
How Role based Monitoring Approach Works?
-
eG agent has details of the eG Innovations AWS Account and access rights.
-
eG agent obtains a dynamic access token that provides it with access to specified objects in customer’s AWS account (as specified in the IAM role)
-
Dynamic access token is valid for 60 mins alone.
-
Since the eG agent is installed in customer premises i.e., the target environment, dynamic token is safe because the token is within the customer premises only and does not leave the premises. All metrics are collected and processed by the eG agent and then transmitted to the eG manager.
-
Note that there is no data stored or transferred to the eG AWS account.
To create an AWS Role manually, you first need to do the following:
-
Create a Policy on AWS Cloud
-
Create a new role for monitoring purposes and assign the created policy to the role.
-
Configure the eG agent with the AWS Account ID that is to be monitored and the role that was created.
Creating a New Policy
To create a new Policy on AWS cloud, do the following:
-
Login to AWS console as a root user or with an account that has privileges to create a new role.
-
Upon successful login, the Services page will appear. Keep scrolling down this page until you view the IAM option.
-
The first step to creating a role is to create a policy that defines the rights and privileges of that role. To create a policy, click on the Policies link in the left panel as shown in Figure 5.
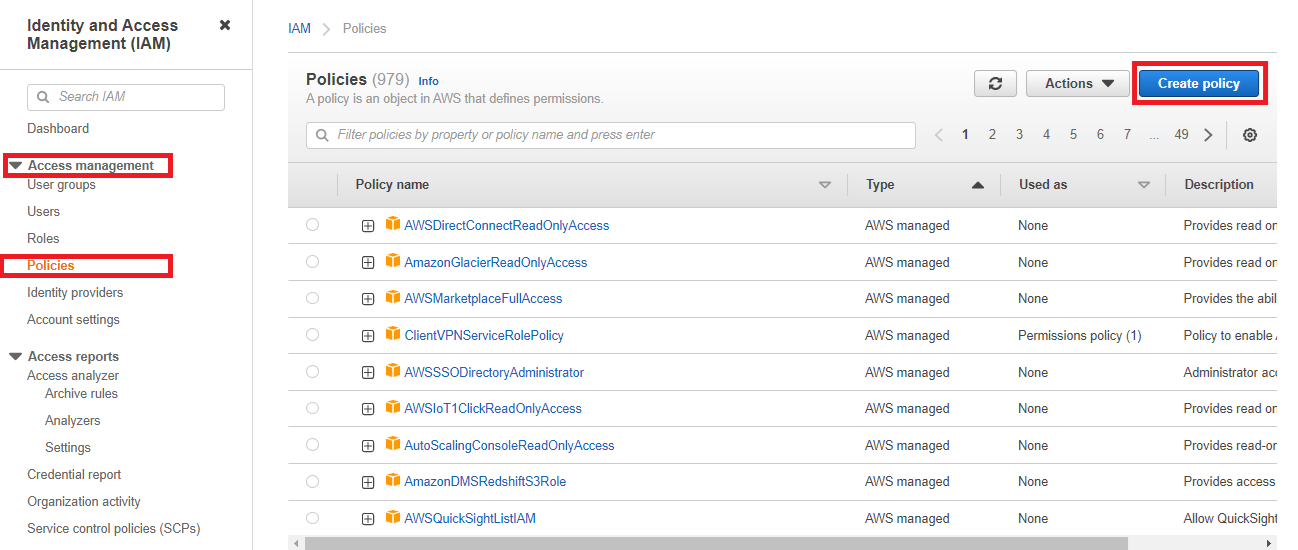
Figure 5 : The Policies page using which new policy can be created
-
The context-sensitive right panel of Figure 5 lists all the pre-existing policies. Click on Create Policy button to create a new policy.
-
In the Create Policy page that appears, click on the JSON tab. Figure 6 will then appear.
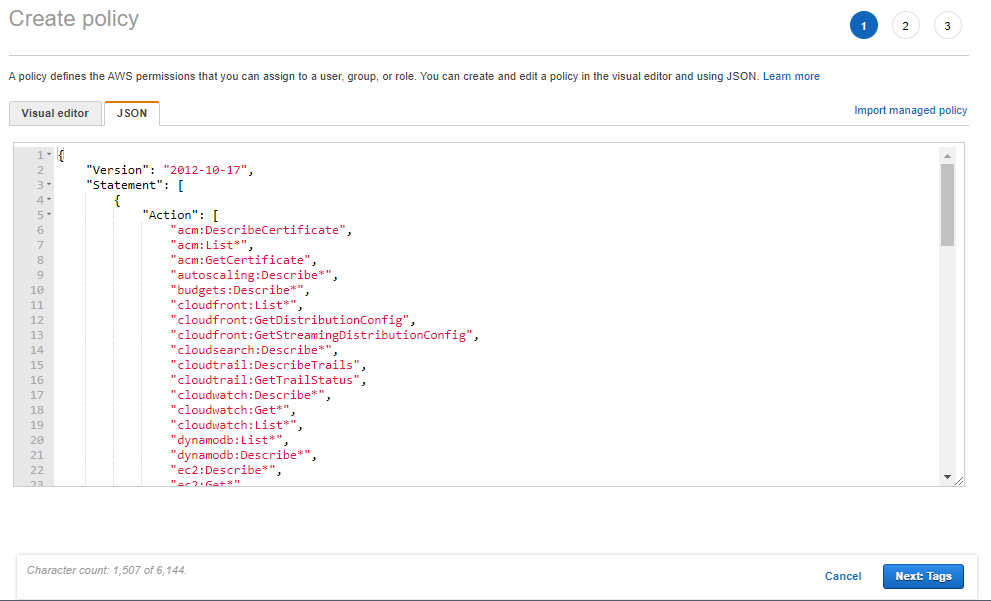
-
Replace the contents of the JSON tab page (see Figure 6) with the following:
{
"Version": "2012-10-17",
"Statement": [
{
“Action”: [
“acm:DescribeCertificate”,
“acm:List*”,
“acm:GetCertificate”,
“autoscaling:Describe*”,
“budgets:Describe*”,
“cloudfront:List*”,
“cloudfront:GetDistributionConfig”,
“cloudfront:GetStreamingDistributionConfig”,
“cloudsearch:Describe*”,
“cloudtrail:DescribeTrails”,
“cloudtrail:GetTrailStatus”,
“cloudwatch:Describe*”,
“cloudwatch:Get*”,
“cloudwatch:List*”,
“dynamodb:List*”,
“dynamodb:Describe*”,
“ec2:Describe*”,
“ec2:Get*”,
“ecs:List*”,
“ecs:Describe*”,
“elasticache:Describe*”,
“elasticache:List*”,
“elasticbeanstalk:Describe*”,
“elasticbeanstalk:List*”,
“elasticfilesystem:Describe*”,
“elasticloadbalancing:Describe*”,
“elasticmapreduce:Describe*”,
“"elasticmapreduce:List*”,
“iam:Get*”,
“iam:List*”,
“iam:GenerateCredentialReport”,
“iot:Describe*”,
“iot:List*”,
“kinesis:List*”,
“kinesis:Describe*”,
“kinesis:Get*”,
“lambda:List*”,
“logs:Get*”,
“logs:Describe*”,
“logs:FilterLogEvents”,
“logs:TestMetricFilter”,
“logs:PutLogEvents”,
“opsworks:Describe*”,
“polly:Describe*”,
“polly:GetLexicon”,
“polly:ListLexicons”,
“rds:Describe*”,
“rds:List*”,
“redshift:Describe*”,
“redshift:ViewQueriesInConsole”,
“route53:List*”,
“s3:Get*”,
“s3:List*”,
“s3:*Object”,
“s3:Object*”,
“ses:ListIdentities”,
“ses:Get*”,
“support:*”,
“sns:Get*”,
“sns:List*”,
“sns:Publish”,
“sqs:List*”,
“sqs:Get*”,
“storagegateway:Describe*”,
“storagegateway:List*”,
“waf:List*”,
“waf:Get*”,
“workspaces:Describe*”,
“Organizations:List*”,
“Organizations:Describe*”,
“appstream:ListAssociated*”,
“appstream:Describe*”,
“ce:Get*”
],
“Effect”: “Allow”,
“Resource”: “*”
}
]
}
Note:
If you copy the above code block directly from this document and paste it in the JSON tab page, you will find that the page numbers in the document also get copied on to the tab page inadvertently. Therefore, after copying the code block to the JSON tab page, make sure you remove the page numbers from the code block and then proceed.
-
Then, click the Next: Tags button in Figure 6 to review the policy that you have defined. In Figure 7 that appears, provide a Name for the new policy and a brief Description of the policy.
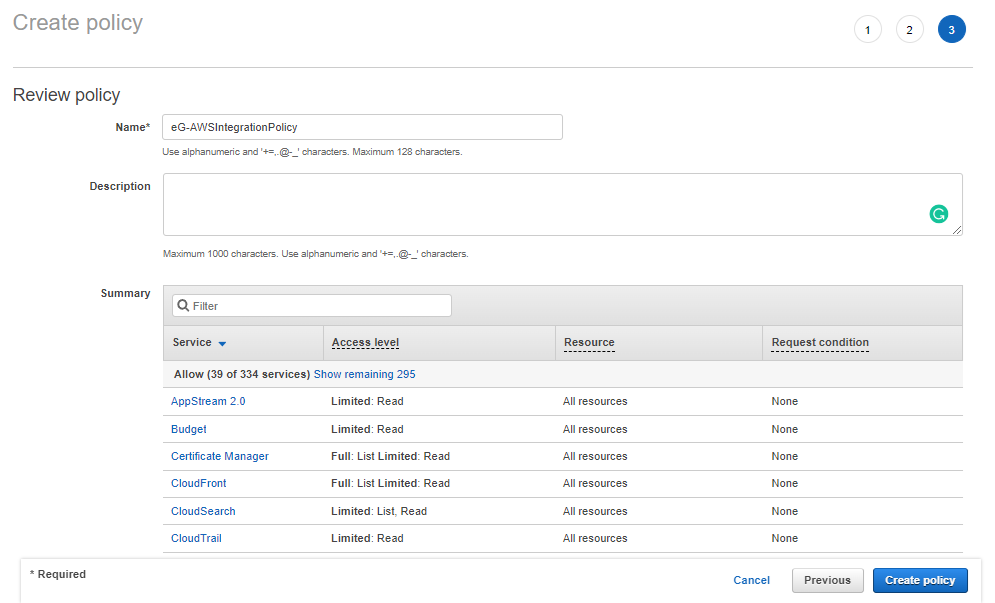
-
The Summary section in Figure 7 lists all the services that this policy allows access to, the level of access (whether Full or Limited), and the resources that can be accessed.
-
Then, click the Create Policy button in Figure 7 to create the new policy.
Creating the New Role by Assigning the Newly Created Policy
To create a new Role on AWS cloud, do the following:
-
Navigate to the AWS IAM Console and click the Roles option in the left panel. Figure 8 then appears.

Figure 8 : The Roles page using which new role can be created
-
The context sensitive right panel of Figure 8 displays all the pre-existing roles.
-
In Figure 8, click the Create Role button to create a new role.
-
Figure 9 will then appear. Here, choose the AWS account tile as the Trusted entity Type.
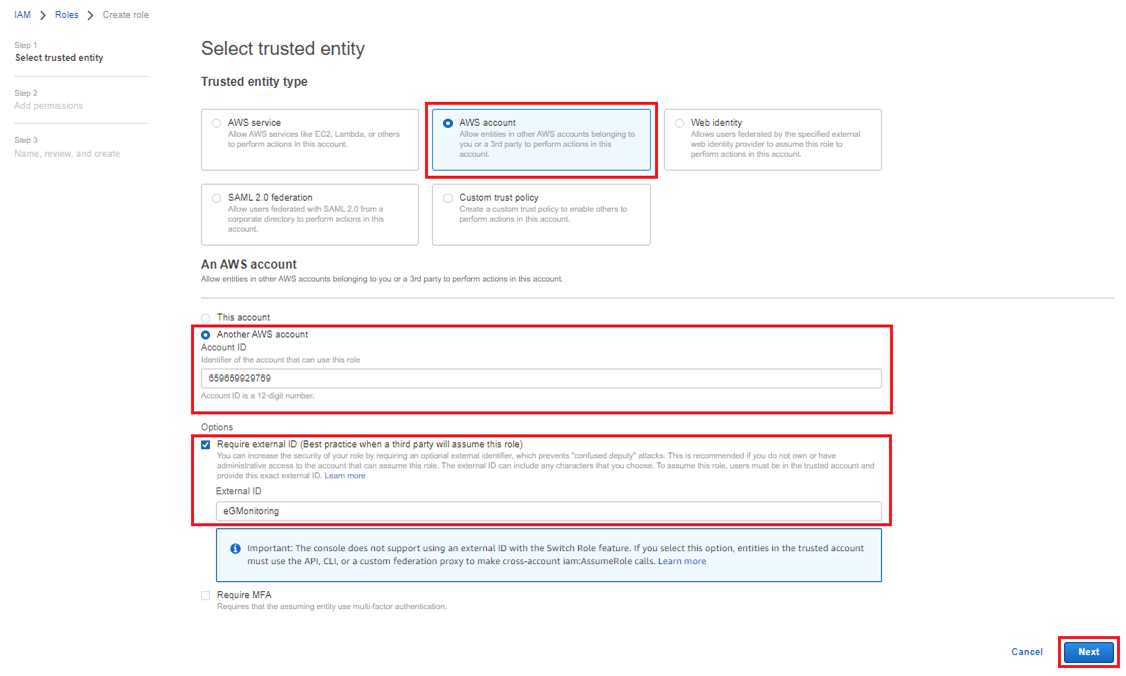
-
A context-sensitive An AWS account section will then appear as shown in Figure 9. Now, selecting Another AWS account option will list an Account ID text box. Here, you should specify the Account ID of eG Enterprise that is shared with you. By default, to monitor the target AWS Cloud, eG agent uses the AWS Account ID of eG Enterprise that is exclusively created for monitoring purpose. This AWS Account ID when linked to the role that you are about to create will ensure that the eG agent collects metrics from the target AWS Cloud. By specifying this Account ID, you are providing read only permission to collect the required metrics from the target AWS Cloud. To know more about how this role based monitoring approach works, refer to Manual Creation of AWS Role. To know the Account ID that belongs to eG Enterprise, contact sales@eginnovations.com.
-
Then, select the check box preceding the Require external ID field (see Figure 9). An External ID text box will then appear. Here, specify an ID of your choice and click the Next button. This External ID should be specified as the Nickname of the AWS Cloud component.
Note:
Ensure that you have unchecked the Require MFA text box as shown in Figure 9.
-
Clicking the Next button in Figure 9 will reveal Figure 10. In this page, all the policies that pre-exist in your environment will be listed. Select the policy that you have created exclusively for monitoring purpose and click the Next button.
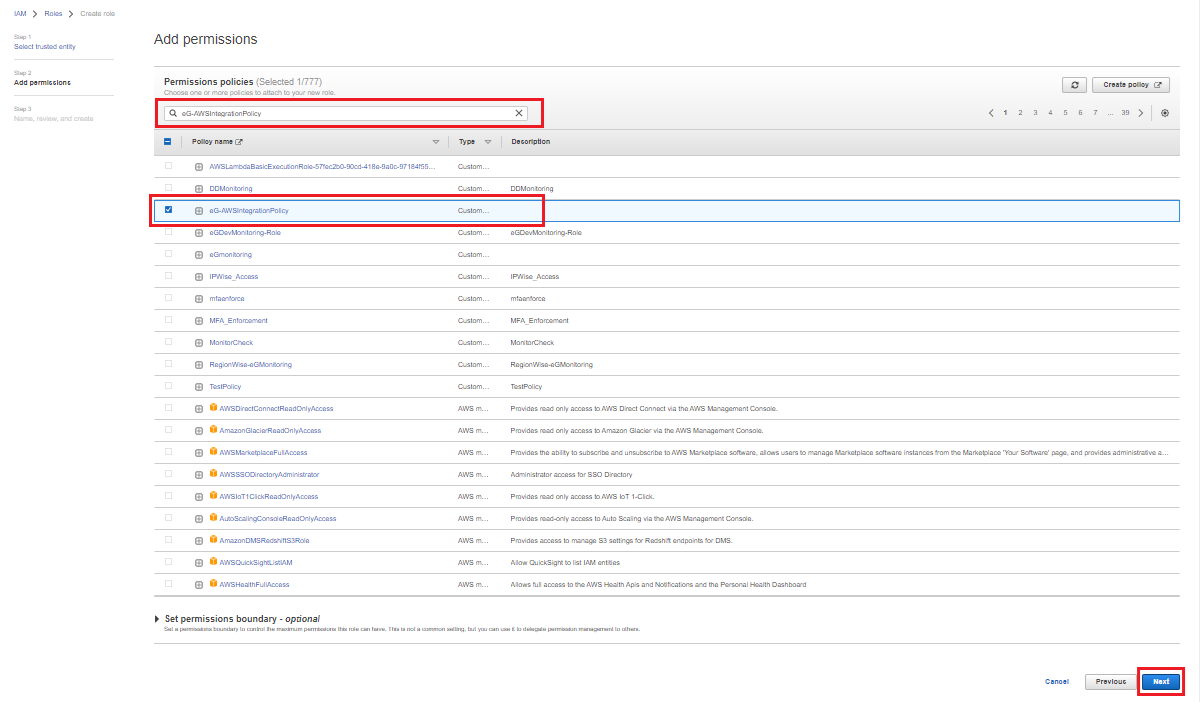
Figure 10 : Associating the newly created Policy with the role
-
In Figure 11 that then appears, specify the name of the role that you wish to create in the Role name text box. Also, specify a description of your choice in the Description text box. Remember that the Role name that you specify here should be specified against the AWS ROLE NAME parameter while configuring the tests pertaining to AWS Cloud component.

Figure 11 : Providing the name for the role that is to be created
-
Clicking the Create Role button at the right bottom of Name, review and create page (Figure 11) will create the new role.
