
Installing eG Node.js BTM on a Node.js Application
The steps for deploying an eG Node.js BTM on a Node.js application will differ based on how the node is being monitored - in an agent-based manner or in an agentless manner.
BTM-Enabling a Node.js Application Monitored in an Agent-based Manner
If the Node.js application is being monitored in an agent-based manner, then follow the steps below to BTM-enable it:
- The first step towards BTM enabling a Node.js application is to install the eG agent on the host/machine where the target Node.js application resides.
- Once the eG agent is installed, the files needed for BTM enabling the Node.js application will be available in the eG agent.
- Now, login to the host/machine where the target Node.js application resides.
- Open a browser on that host/machine, connect to the eG manager, and login to the eG admin interface.
- Manage the target Node.js application as a separate component using the eG administrative interface. When managing, make sure you leave the Agentless flag unchecked.
- If multiple Node.js applications or instances are operating on a single machine/host, and you want to BTM-enable all the Node.js applications/instances, then you will have to manage each Node.js application/instance as a separate component using the eG administrative interface.
-
Next, follow the Agents -> BTM Profiler Settings menu sequence in the eG admin interface. Figure 1 will then appear listing all the BTM-enabled applications (both Java application servers and Node.js applications) managed in the environment. Locate the Node.js application that you managed recently in that list, and click the Copy Node Js Options icon (
 ) corresponding to it (see Figure 1).
Figure 1 : Clicking the Copy Node.js options icon corresponding to the Node.js application managed in an agent-based manner
-
Figure 2 will then appear.
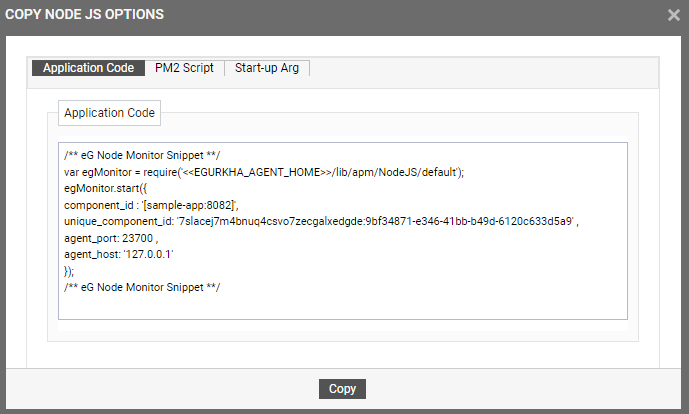
Figure 2 : Copying the Node.js options displayed in the admin interface
-
By default, you can BTM-enable the Node.js application using the following methods:
-
By adding the snippet available in the Application Code tab of Figure 2 to the start up script file of the target Node.js application.
-
By adding the snippet available in the PM2 Script tab of Figure 2 to the ecosystem.config.js file of the target Node.js application. Note that you can use this method only when the target Node.js application is deployed using PM2.
-
By adding the snippet available in the Start-up Arg tab of Figure 2 to the start up arguments while the target Node.js application is started using command prompt.
-
-
To add the snippet available in the Application Code tab of Figure 2 to the start up script file of the target Node.js application, do the following:
-
Copy the snippet displayed in Figure 2 to the clip board or any text editor.
-
Then, proceed to edit the start-up script file of the Node.js application/instance being monitored. Append the code block you copied as the first line of your start-up script file (see Figure 3). After inserting the copied Node.js options, make sure that you replace the <<EGURKHA_AGENT_HOME>> tag in the copied code block with the actual install directory of the eG agent deployed on the Node.js application/instance.
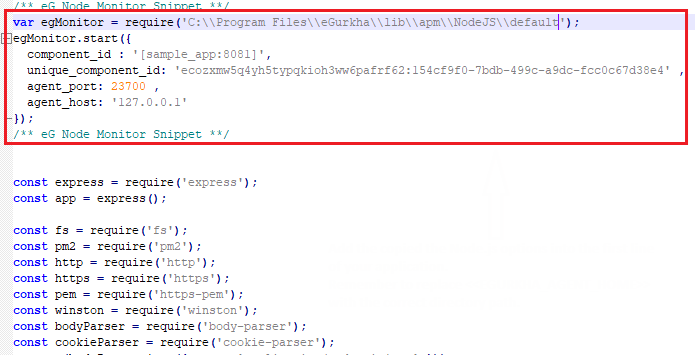
Figure 3 : A Sample script file appended with application code
-
-
If the target Node.js application is deployed using PM2 in the target environment, then, the PM2 process manager uses a configuration file called ecosystem.config.js (available in the install directory of the target Node.js application) to define and manage your Node.js processes. To BTM-enable the Node.js application, you should add the snippet available in the PM2 Script tab of Figure 3 to the ecosystem.config.js file. For this, do the following:
-
Copy the snippet displayed in Figure 4 to the clip board or any text editor.
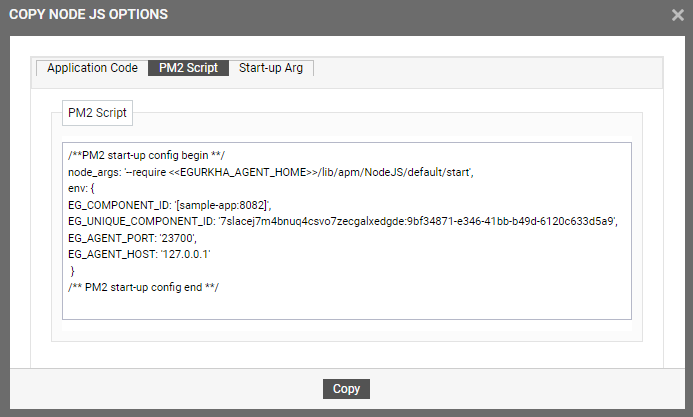
Figure 4 : Copying the Node.js options from the PM2 Script tab
-
Then, proceed to edit the ecosystem.config.jsfile of the Node.js application/instance being monitored. Append the code block you copied as the first line of your ecosystem.config.js file (see Figure 5). After inserting the copied Node.js options, make sure that you replace the <<EGURKHA_AGENT_HOME>> tag in the copied code block with the actual install directory of the eG agent deployed on the Node,js application/instance.
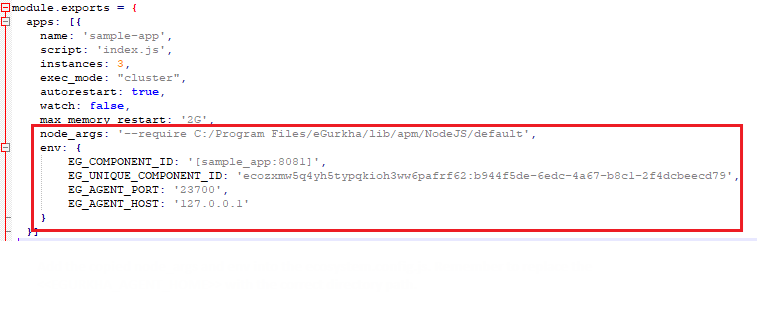
Figure 5 : A sample ecosystem.config.js file appended with PM2 script
-
-
If you wish to start the target Node.js application/instance using command prompt in the target environment, then, to BTM-enable the target Node.js application/instance, you should add the snippet available in the Start up Arg tab of Figure 6 to the server startup arguments. For this, do the following:
-
Copy the snippet displayed in Figure 6 to the clip board or any text editor.

Figure 6 : Copying the Node.js options from the Start up Arg tab
-
Open the command prompt, and append the code block you copied for execution as shown in Figure 7. After inserting the copied Node.js options, make sure that you replace the <<EGURKHA_AGENT_HOME>> tag in the copied code block with the actual install directory of the eG agent deployed on the Node,js application server instance and also replace the <<path to app(start file)>> with the actual start up file of the target Node.js application/ instance that is to be BTM-enabled.

Figure 7 : Sample start up arguments appended to start the Node.js application from command prompt
-
- Finally, restart the target Node.js application/instance.
- If multiple Node.js applications/instances are monitored, make sure you follow steps 5-13 for each Node.js application/ instance.
BTM-Enabling a Node.js Application Monitored in an Agentless Manner
To achieve this, follow the steps below:
- Login to the machine on which the target Node.js application is installed.
- Open a browser on the machine, connect to the eG manager, and login to the eG admin interface.
- Manage the Node.js application server as a separate component using the eG administrative interface. When managing, make sure you enable the Agentless flag.
- If multiple Node.js applications/instances are operating on the same machine, and you want to BTM-enable all the instances, then you will have to manage each instance as a separate component using the eG administrative interface. When doing so, make a note of the Nick name and Port number using which you managed each instance.
- Next, log out of the eG admin interface. Then, create a btm directory anywhere on the machine on which the target Node.js application/instance is installed - say, C:\btm (if the target Node.js application/instance is operating on a Windows system), or /opt/btm (if the target Node.js application/instance is operating on a Unix system). Under this directory, create a sub-folder. Make sure that you name this sub-folder in the following format: <Managed_Component_NickName>_<Managed_Component_Port>. For instance, if you have managed the Node.js application/instance using the nick name Node.jsAppServer1 and the port number 3000, the new directory under the btm directory should be named as Node.jsAppServer1_3000.
-
If you have managed multiple Node.js applications/instances running on a single machine, then you will have to create multiple sub-directories under the btm directory - one each for every application/instance. Each of these sub-directories should be named after the Nick name and Port number using which the corresponding application/instance had been managed in eG.
- Once the new sub-directory(ies) is created, open a browser on the machine on which the Node.js applications/instances are installed, connect to the eG manager, and login to the eG admin interface again.
- Follow the Agents -> BTM Profiler Settings menu sequence in the eG admin interface.
-
Figure 8 will appear listing the servers that can be instrumented for Application Performance Monitoring (APM) by eG. In this list, locate the Node.js application/instance that you want to BTM-enable. Once you locate the application/instance, click the Download icon corresponding to that application/instance to download the Node.js Profiler Agent to that instance. If multiple Node.js applications/instances on a single machine are managed, then you should download the Node.js Profiler Agent separately for each of the managed instances.
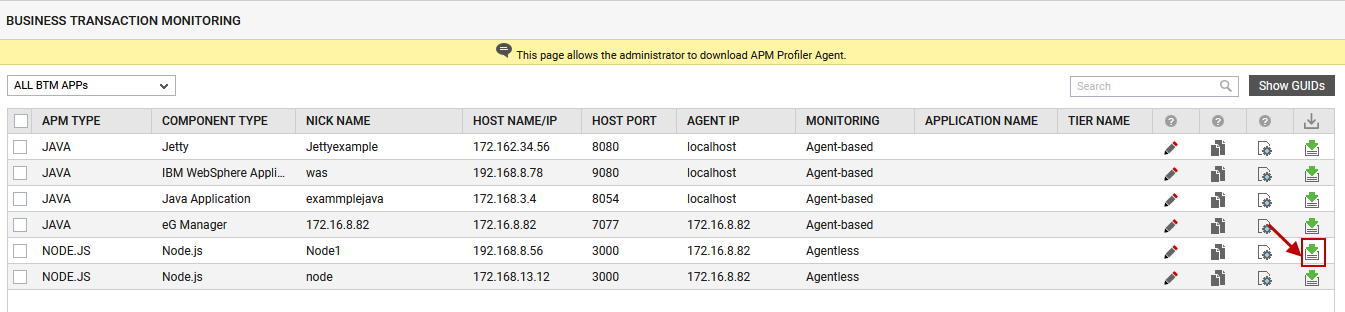
Figure 8 : Downloading the Node.js Profiler Agent for the Nodejs application/instance
- Upon clicking the Download icon in Figure 8, a zip file named eg-node-monitor will get downloaded. Where multiple Node.js applications/instances have been managed, you will be downloading multiple zip files - one each for every Node.js application/instance.
- Copy the downloaded zip file(s) to the corresponding sub-directory(ies) of the btm directory (see step 7 above). For example, the zip file named eg-node-monitor, should be copied to the C:\btm\Node.jsAppServer1_3000 directory (on Windows) or /opt/btm/Node.jsAppServer1_3000 (on Unix).
- Extract the contents of each zip file into the same sub-directory to which that zip file was copied.
-
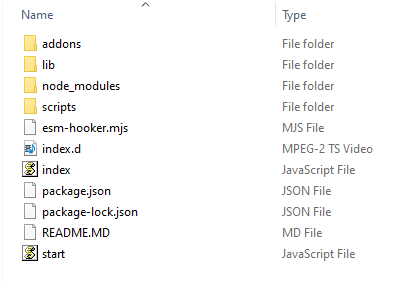
Figure 9 depicts the extracted contents of the zip file.
-
From Figure 9, it is evident that the zip file contains index.js and start.js files along with a few other folders.
-
Next, click the Copy Node Js Options icon (
) corresponding to the Node.js application server instance that you have managed(see Figure 10).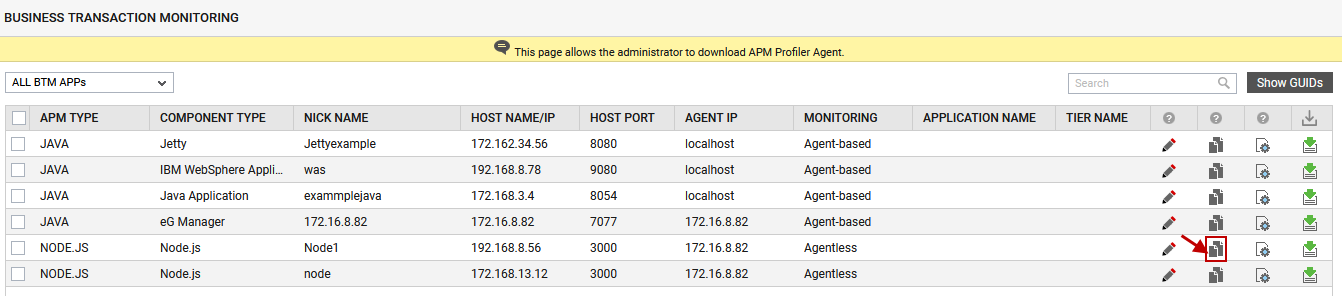
Figure 10 : Clicking the Copy Node.js options corresponding to the Node.js application managed in an agentless manner
-
Figure 11 will then appear.
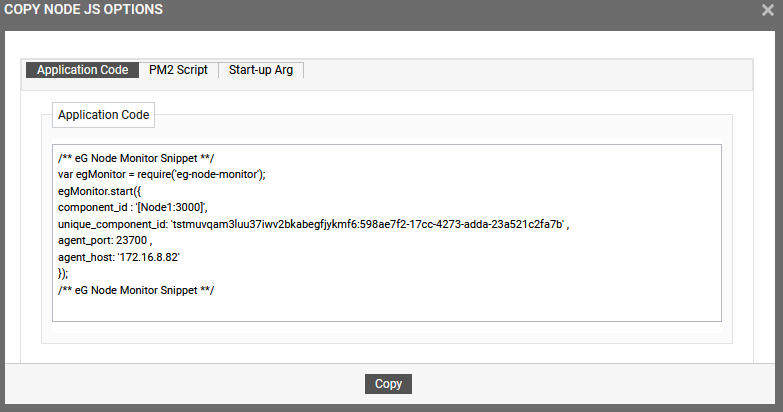
Figure 11 : Copying the Node.js options for a Node.js application server instance managed in an agentless manner
-
By default, you can BTM-enable the Node.js application using the following methods:
-
By adding the snippet available in the Application Code tab of Figure 11 to the start up script file of the target Node.js application.
-
By adding the snippet available in the PM2 Script tab of Figure 11 to the ecosystem.config.js file of the target Node.js application. Note that you can use this method only when the target Node.js application is deployed using PM2.
-
By adding the snippet available in the Start-up Arg tab of Figure 11 to the start up arguments while the target Node.js application is started using command prompt.
-
-
To add the snippet available in the Application Code tab of Figure 11 to the start up script file of the target Node.js application, do the following:
-
Copy the snippet displayed in Figure 11 to the clip board or any text editor.
-
Then, proceed to edit the start-up script file of the Node.js application server instance being monitored. Append the code block you copied as the first line of your start-up script file (see Figure 12).
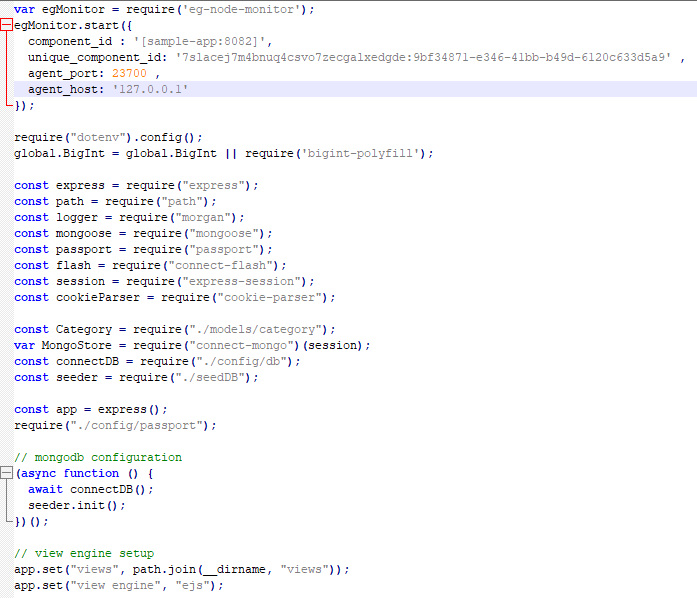
Figure 12 : A Sample script file appended with application code
-
-
If the target Node.js application server instance is deployed using PM2 in the target environment, then, the PM2 process manager uses a configuration file called ecosystem.config.js (available in the install directory of the target Node.js application) to define and manage your Node.js processes. To BTM-enable the Node.js application server instance, you should add the snippet available in the PM2 Script tab of Figure 13 to the ecosystem.config.js file. For this, do the following:
-
Copy the snippet displayed in Figure 13 to the clip board or any text editor.
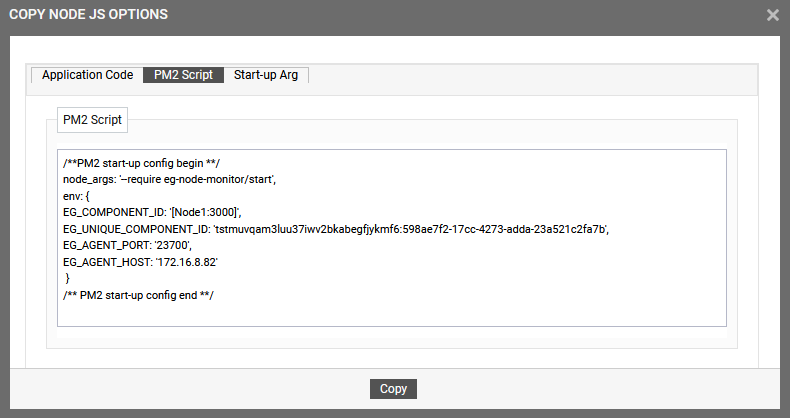
Figure 13 : Copying the Node.js options from the PM2 Script tab
-
Then, proceed to edit the ecosystem.config.jsfile of the Node.js application/instance being monitored. Append the code block you copied as the first line of your ecosystem.config.js file (see Figure 14).
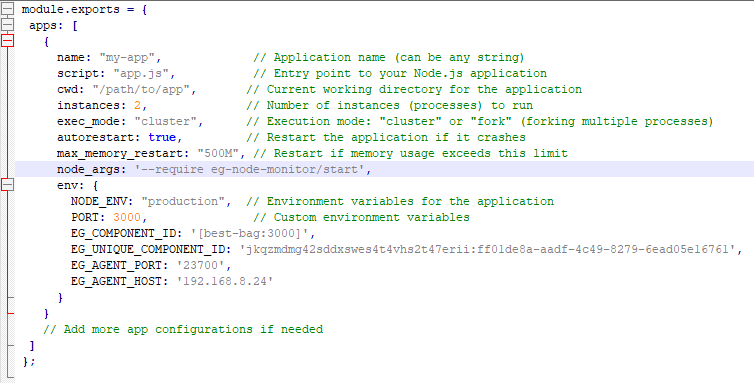
Figure 14 : A sample ecosystem.config.js file appended with PM2 script
-
-
If you wish to start the target Node.js application/instance using command prompt in the target environment, then, to BTM-enable the target Node.js application/instance, you should add the snippet available in the Start up Arg tab of Figure 15 to the server startup arguments. For this, do the following:
-
Copy the snippet displayed in Figure 15 to the clip board or any text editor.

Figure 15 : Copying the Node.js options from the Start up Arg tab
-
Open the command prompt, and append the code block you copied for execution as shown in Figure 16.

Figure 16 : Sample start up arguments appended to start the Node.js application from command prompt
-
- Finally, save the file, and restart the Node.js application/instance.
- If multiple Node.js application server instances installed on a single machine are monitored, make sure you follow steps 17-21 for each Node.js application/ instance.
BTM-Enabling a Node.js Application Installed on a Kubernetes Container
To BTM enable a Node.js application that is installed on a Kubernetes container, administrators should do the following:
-
By default, eG Enterprise hosts a Node.js Profiler image in the docker respository. Administrators can use this Node.js Profiler or build their own Node.js Profiler.
-
The next step towards BTM enabling a Node.js application is to create a volume on the kubernetes container. This volume is the location where all the information of the Node.js application will be exclusively stored. To create the volume, edit the yaml file of the target Node.js application. For example, if you are creating a volume named egbtm, then, edit the volumes section of the file as shown below:
volumes:
# Make egbtm available as a volume
- name: egbtm
emptyDir: {} -
Next, you should edit the initContainers section with the specification as shown below. Note that egbtm mentioned in the example is the name of the volume that was created. Here, the Node.js Monitor image is the location from where the Node.js Profiler is to be downloaded. By default, eG Enterprise hosts the Node.js Profiler in the following location: https://hub.docker.com/r/eginnovations/nodejs-profiler
initContainers:
- name: setup-egbtm
image: <<Node.js Monitor image>>
command: ["/bin/sh","copy.sh"]
args:
- /opt/egbtm
volumeMounts:
- mountPath: /opt/egbtm
name: egbtm -
Next, you should edit the containers section with the specification as shown below. Here, the Application image is the location of the Node.js application image that is hosted on the Kubernetes container.
containers:
image: <<Application image>>
env:
- name: NODE_OPTIONS
value: "--require=/opt/egbtm/start"
- name: EG_AGENT_HOST
valueFrom:
fieldRef:
fieldPath: status.hostIP
volumeMounts:
- name: egbtm
mountPath: /opt/egbtm
Once this is done, Kubernetes will automatically download the Node.js Profiler image and enable the Node.js Profiler. Once the Node.js Profiler is enabled, eG Enterprise will automatically discover all the Node.js applications installed on the Kubernetes container and will start monitoring each of the Node.js application as an individual component.
