
How Does eG Enterprise Monitor Tomcat Servers?
The eG agent is capable of monitoring Tomcat in an agent-based manner and an agentless manner.
Pre-requisites for Monitoring the Tomcat Servers
One of the key pre-requisites for monitoring Tomcat is configuring the eG agent to pull the desired metrics from the target Tomcat server. Typically, you can monitor the Tomcat server in one of the following ways. The procedure for configuring the eG agent changes with the monitoring approach you choose.
-
Configure the eG agent to use a proprietary WAR file deployed in the <EG_INSTALL_DIR>\lib directory of the eG agent host. To know how to achieve this, refer to the Deploying a WAR File to Monitor the Tomcat Server topic;
-
Configure the eG agent to contact the Java runtime (JRE) of Tomcat via JMX. To know how to achieve this, refer to the Using JMX to Monitor the Tomcat Server/JVM topic
Also, to monitor Tomcat's JVM, you should configure one of the following approaches:
-
Configure the eG agent to use the eg_btm.jar file available in the <eG_INSTALL_DIR>\lib\apm\java\default folder;
-
Configure the eG agent to use SNMP-based access to the Java runtime MIB statistics; to know how to achieve this, refer to the Enabling SNMP Support for JRE topic;
-
Configure the eG agent contacting the Java runtime (JRE) of the application via JMX; to know how to achieve this, refer to the Using JMX to Monitor the Tomcat Server/JVM topic
These requirements are discussed in the following sections.
Deploying a WAR File to Monitor the Tomcat Server
The performance data pertaining to the target Tomcat server is captured by certain JSP files - one each for every test that is executed on the Tomcat server. The eG agent on the Tomcat server, while running tests on the server, contacts these JSP files and pulls out the reported metrics from them. To deploy these JSP files on the Tomcat server, you will first have to install a special egtomcat application - i.e., the egtomcat.war file in the <EG_INSTALL_DIR>\lib directory (on Windows; on Unix, this will be /opt/egurkha/lib directory) on the server.
Note:
Prior to war deployment, ensure that the Tomcat server to be monitored executes on JDK 1.5 or above; the eG agent can monitor only those Tomcat servers that are using JDK 1.5 or above.
To deploy the war, do the following:
-
From the browser, connect to the Tomcat server using the URL: http://<TomcatIP>:<Tomcatport>. Figure 1 will then appear.
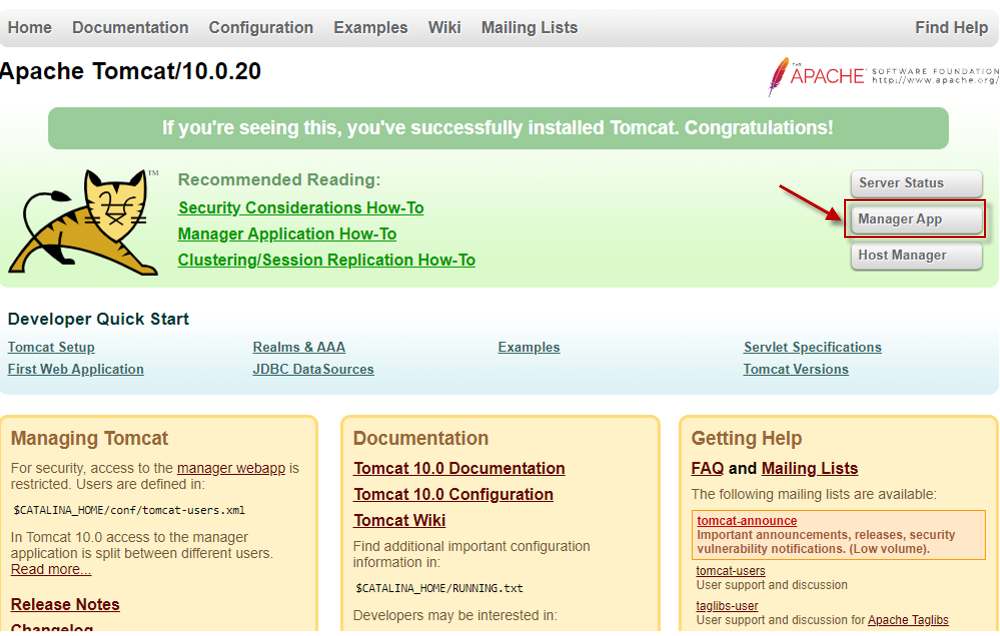
Figure 1 : The Tomcat server home page
-
To login to the Tomcat server to be monitored, click on the Manager App button (indicated by Figure 1 above).
-
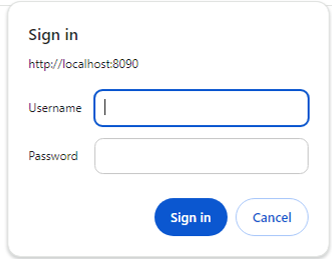
When Figure 2 appears, login to the Tomcat server by providing the valid credentials of an administrator.
-
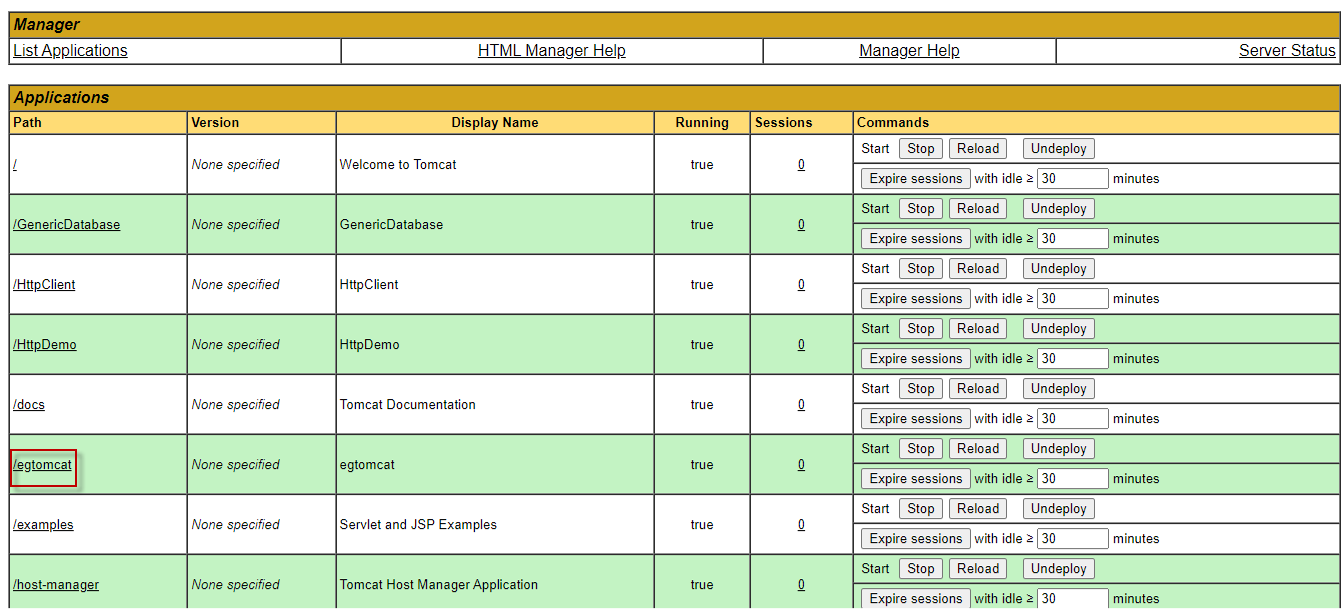
Upon a successful login, Figure 3 will appear listing the applications that pre-exist on the target Tomcat server.

Figure 3 : The list of applications that pre-exist on the Tomcat server
-
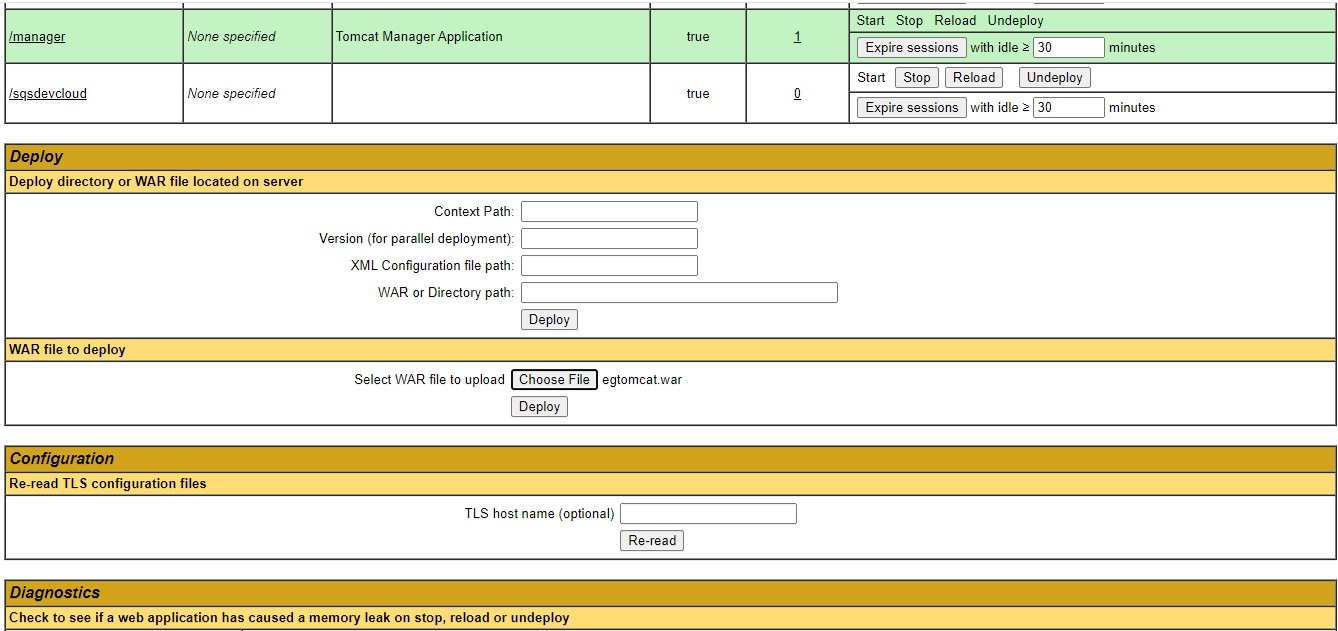
To begin installing a new application, keep scrolling down the application list of Figure 3 until the WAR file to deploy section becomes visible (see Figure 4). Once you see that section, click on the Choose file button within to browse for the egtomcat.war file that you need to deploy. Remember that this file will be available in the <EG_INSTALL_DIR>\lib directory (on Windows; on Unix, this will be the /opt/egurkha/lib directory). After selecting the file, click on the Deploy button in Figure 4.
-
If the war file is successfully deployed, then an entry for the egtomcat application will be automatically added to the applications list, as depicted by Figure 5. Another sign of successful deployment is the status 'true' been displayed in the Running column corresponding to the application.
Using JMX to Monitor the Tomcat Server/JVM
The eG agent can contact the JRE used by the Tomcat application server via JMX to pull metrics. For that, follow the broad steps below:
-
First, determine whether the JMX requires no authentication at all, or requires authentication (but no security)
- If JMX does not require authentication, follow the steps below:
- Login to the target Tomcat server.
-
Edit the catalina.sh file (on Unix; on Windows, this will be catalina.bat) in the <CATALINA_HOME_DIR>\bindirectory (on Unix; on Windows, this will be <CATALINE_HOME_DIR>\bin) of the target Tomcat server, and configure the following in it:
- The JMX remote port
- Whether JMX is SSL-enabled or not
-
Indicate that JMX does not require authentication
- The IP address using which the Tomcat server has been managed in the eG Enterprise system
-
To configure the above, append the following lines to the catalina.sh (or catalina.bat file, as the case may be) of Tomcat versions prior to v7.0:
-Dcom.sun.management.jmxremote.port=<Port No>
-Dcom.sun.management.jmxremote.ssl=<true/false>
-Dcom.sun.management.jmxremote.authenticate=false
-Djava.rmi.server.hostname=<IP address using which the Tomcat server is managed in the eG Entperprise system>
In case of Tomcat 7.0 (or above), append the following lines to the catalina.sh (or catalina.bat) file:
JAVA_OPTS="-Dcom.sun.management.jmxremote.port=<PortNo> -Dcom.sun.management.jmxremote.ssl=<true/false> -Dcom.sun.management.jmxremote.authenticate=false -Djava.rmi.server.hostname=<IP address using which the Tomcat server is managed in the eG Enterprise system>
Note:
-
The catalina.sh (or catalina.bat) file is used for both starting and stopping a Tomcat server instance. However, when enabling JMX for a Tomcat server instance, you need to make sure that the related JAVA_OPTS setting is invoked only when starting the server instance, and not when stopping it. To ensure this, follow the steps below:
-
In the catalina.sh (or catalina.bat) file, look for the following entry:
-
Once it is found, replace the entry with the following script:
If [“$1” = start ]; then
JAVA_OPTS=$JAVA_OPTS -Dcom.sun.management.jmxremote.port=1234 -Dcom.sun.management.jmxremote.authenticate=false -Dcom.sun.management.jmxremote.ssl=false $JSSE_OPTS
else
JAVA_OPTS=$JAVA_OPTS $JSSE_OPTS
fi
-
Finally, save the file.
JAVA_OPTS=$JAVA_OPTS $JSSE_OPTS
-
The Java Service Wrapper provides a pair of Java Management Extensions (JMX) MBean interfaces (J2SE 5.0 JMX, JavaSE6 JMX) which make it possible to control the Wrapper using a JMX interface.
-
If the JMX requires authentication (but no security), follow the steps below:
- Login to the target Tomcat server. If the server is executing on a Windows host, then, login to the host as a local/domain administrator.
- Next, copy the jmxremote.password.template file in the <JAVA_HOME>\jre\lib\management folder to any other location on the host, rename it as as jmxremote.password, and then, copy it back to the <JAVA_HOME>\jre\lib\management folder.
- Next, edit the jmxremote.password file and the jmxremote.access file to create a user with read-write access to the JMX. To know how to create such a user, refer to Monitoring Java Applications.
- Then, proceed to make the jmxremote.password file secure by granting a single user “full access” to that file. To know how to achieve this, refer to the Monitoring Java Applications.
-
Edit the catalina.sh file (on Unix; on Windows, this will be catalina.bat) in the <CATALINA_HOME_DIR>/bin directory (on Unix; on Windows, this will be <CATALINA_HOME_dir>\bin) of the target Tomcat server, and configure the following in it:
- The JMX remote port
- Whether JMX is SSL-enabled or not
- Indicate that JMX requires authentication
- The full path to the jmxremote.access file
- The full path to the jmxremote.password file
- The IP address using which the Tomcat server has been managed in the eG Enterprise system
-
To configure the above, append the following lines to the catalina.sh (or catalina.bat file, as the case may be) file of Tomcat server prior to v7.0:
-Dcom.sun.management.jmxremote.port=<Port No>
-Dcom.sun.management.jmxremote.ssl=<true/false>
-Dcom.sun.management.jmxremote.authenticate=true
-Dcom.sun.management.jmxremote.access.file=<Path of jmxremote.access>
-Dcom.sun.management.jmxremote.password.file=<Path of jmxremote.password>
-Djava.rmi.server.hostname=<IP address using which the Tomcat server is managed in the eG Entperprise system>
-
In case of Tomcat 7.0 (or above), append the following lines to the catalina.sh (or catalina.bat) file:
JAVA_OPTS="-Dcom.sun.management.jmxremote.port=<PortNo> -Dcom.sun.management.jmxremote.ssl=<true/false> -Dcom.sun.management.jmxremote.authenticate=false -Djava.rmi.server.hostname=<IP address using which the Tomcat server is managed in the eG Enterprise system> -Dcom.sun.management.jmxremote.access.file=<Path to the jmxremote.access file> -Dcom.sun.management.jmxremote.password.file=<Path to the jmxremote.password file>"
- Then, Save the file.
Enabling SNMP Support for JRE
Instead of JMX, you can configure the eG agent to monitor a Java application using SNMP-based access to the Java runtime MIB statistics.
In some environments, SNMP access might have to be authenticated by an ACL (Access Control List), and in some other cases, it might not require an ACL.
If SNMP access does not require ACL authentication, then follow the steps below to enable SNMP support:
- Login to the application host.
- Ensure that the SNMP service and the SNMP Trap Service are running on the host.
- Next, edit the management.properties file in the <JAVA_HOME>\jre\lib\management folder used by the target application.
-
Append the following lines to the file:
com.sun.management.snmp.port=<Port No>
com.sun.management.snmp.interface=0.0.0.0
com.sun.management.snmp.acl=false
For instance, if the SNMP port is 1166, then the first line of the above specification will be:
com.sun.management.snmp.port=1166
If the second line of the specification is set to 0.0.0.0, then, it indicates that the JRE will accept SNMP requests from any host in the environment. To ensure that the JRE services only those SNMP requests that are received from the eG agent, set the second line of the specification to the IP address of the agent host. For instance, if the eG agent to monitor the Java application is executing on 192.168.10.152, then the second line of the specification will be:
com.sun.management.snmp.interface=192.168.10.152
-
Next, edit the start-up script of the target application, include the following line it, and save the script file.
-Dcom.sun.management.config.file=<management.properties_file_path>
-
For instance, on a Windows host, the <management.properties_file_path> can be expressed as: D:\bea\jrockit_150_11\jre\lib\management\management.properties.
-
On other hand, on a Unix/Linux/Solaris host, a sample <management.properties_file_path> specification will be as follows: /usr/jdk1.5.0_05/jre/lib/management/management.properties.
On the contrary, if SNMP access requires ACL authentication, then follow the steps below to enable SNMP support for the JRE:
- Login to the application host. If the target application is executing on a Windows host, login as a local/domain administrator.
- Ensure that the SNMP service and SNMP Trap Service are running on the host.
- Copy the snmp.acl.template file in the <java_home>\jre\lib\management folder to another location on the local host. Rename the snmap.acl.template file as snmp.acl, and copy the snmp.acl file back to the <java_home>\jre\lib\management folder.
-
Next, edit the snmp.acl file, and set rules for SNMP access in the file.

Figure 6 : The snmp.acl file
-
For that, first scroll down the file to view the sample code block revealed by Figure 7.

-
Uncomment the code block by removing the # symbol preceding each line of the block as indicated by Figure 8.

- Next, edit the code block to suit your environment.
-
The acl block expects the following parameters:
- communities : Provide a comma-separated list of community strings, which an SNMP request should carry for it to be serviced by this JRE; in the example illustrated by Figure 17, the community strings recognized by this JRE are public and private. You can add more to this list, or remove a community string from this list, if need be.
- access : Indicate the access rights that SNMP requests containing the defined communities will have; in Figure 8, SNMP requests containing the community string public or private, will have only read-only access to the MIB statistics. To grant full access, you can specify rea-write instead.
- managers : Specify a comma-separated list of SNMP managers or hosts from which SNMP requests will be accepted by this JRE; in the example illustrated by Figure 8, all SNMP requests from the localhost will be serviced by this JRE. Typically, since the SNMP requests originate from an eG agent, the IP of the eG agent should be configured against the managers parameter. For instance, if the IP address of the agent host is 192.16.10.160, then, to ensure that the JRE accepts requests from the eG agent alone, set managers to 192.168.10.160, instead of localhost.
-
Every acl block in the snmp.acl file should have a corresponding trap block. This trap block should be configured with the following values:
- trap-community: Provide a comma-separated list of community strings that can be used by SNMP traps sent by the Java application to the managers specified in the acl block. In the example of Figure 8, all SNMP traps sent by the Java application being monitored should use the community string public only.
- hosts: Specify a comma-separated list of IP addresses / host names of hosts from which SNMP traps can be sent. In the case of Figure 8, traps can be sent by the localhost only. If a single snmp.acl file is being centrally used by multiple applications/devices executing on multiple hosts, then to ensure that all such applications are able to send traps to the configured SNMP managers (in the acl block), you can provide the IP address/hostname of these applications as a comma-separated list against hosts.
-
Figure 9 depicts how the acl and trap blocks can be slightly changed to suit the monitoring needs of an application.

- Then, proceed to make the snmp.acl file secure by granting a single user “full access” to that file. For monitoring applications executing on Windows in particular, only the Owner of the snmp,.acl file should have full control of that file. To know how to grant this privilege to the Owner of a file, refer to Securing the ‘jmxremote.password’ file . This section actually details the procedure for making the jmxremote.password file on Windows, secure. Use the same procedure for making the snmp.acl file on Windows secure, but make sure that you select the snmp.acl file and not the jmxremote.password file.
-
In case of applications executing on Solaris / Linux hosts on the other hand, any user can be granted full access to the snmp.acl file, by following the steps below:
- Login to the host as the user who is to be granted full control of the snmp.acl file.
-
Issue the following command:
chmod 600 snmp.acl
- This will automatically grant the login user full access to the jmxremote.password file.
- Next, edit the management.properties file in the <JAVA_HOME>\jre\lib\management folder used by the target application.
-
Append the following lines to the file:
com.sun.management.snmp.port=<PortNo>
com.sun.management.snmp.interface=0.0.0.0
com.sun.management.snmp.acl=true
com.sun.management.snmp.acl.file=<Path_of_snmp.acl>
If the second line of the specification is set to 0.0.0.0, then, it indicates that the JRE will accept SNMP requests from any host in the environment. To ensure that the JRE services only those SNMP requests that are received from the eG agent, set the second line of the specification to the IP address of the agent host.
For example, if the Java application being monitored listens for SNMP requests at port number 1166, the eG agent monitoring the Java application is deployed on 192.168.10.152, and these SNMP requests need to be authenticated using the snmp.acl file in the D:\bea\jrockit_150_11\jre\lib directory, then the above specification will read as follows:
com.sun.management.snmp.port=1166
com.sun.management.snmp.interface=192.168.10.152
com.sun.management.snmp.acl=true com.sun.management.snmp.acl.file=D:\\bea\\jrockit_150_11\\jre\\lib\\management\\snmp.acl
-
However, if the application in question is executing on a Unix/Solaris/Linux host, and the snmp.acl file is in the /usr/jdk1.5.0_05/jre/lib/management folder of the host, then the last line of the specification will be:
com.sun.management.snmp.acl.file =/usr/jdk1.5.0_05/jre/lib/management/snmp.acl
-
Next, edit the start-up script of the target application, include the following line in it, and save the script file.
-Dcom.sun.management.config.file=<management.properties_file_path>
- For instance, on a Windows host, the <management.properties_file_path> can be expressed as: D:\bea\jrockit_150_11\jre\lib\management\management.properties.
- On other hand, on a Unix/Linux/Solaris host, a sample <management.properties_file_path> specification will be as follows: /usr/jdk1.5.0_05/jre/lib/management/management.properties.
The sections to come discuss the top 2 layers of Figure 234, as the remaining layers have already been discussed at length in the Monitoring Unix and Windows Servers document.
