
Automated Installation of eG Agents in a SaaS Deployment
In case of a SaaS deployment, the eG manager is hosted on the cloud. This means that the infrastructure/applications will not be accessible to the eG manager. As a result, it is not possible for the eG manager to 'push' agents to the target hosts.
To automate agent installation in a SaaS deployment therefore, you need to do the following:
-
Download the agents and the installer from the eG manager to an on-premises system
-
Use the agent installer to push agents to target systems
The key requirements / conditions for this automation are as follows:
-
The eG manager can run on Windows/Linux;
-
The target agent hosts should only run Windows operating systems with .NET Framework v4.5 or above; agents cannot be pushed to Linux hosts;
-
For domain-based discovery of target hosts, the eG agent installers should be transferred to a domain-attached system only.
-
The target systems should be reachable from the system on which the eG agent installer is run;
-
Before you attempt to push agents to Windows hosts (attached to / not attached to a domain), make sure that the following requirements are fulfilled:
-
File and print sharing should be enabled on the target system;
-
ADMIN$ share should be enabled on the target system;
-
The following services should be up and running on the target:
Service Name Service Display Name WMI service winmgmt Remote Procedure Call RpcSs RPC Endpoint Mapper RpcEptMapper -
The following ports should be opened for communication between the system running the agent installer and the target system:
Protocol Port Service Name TCP 135 RPC UDP 137 NetBios Name Resolution UDP 138 NetBiod Datagram Service UDP 139 NetBios Session Service TCP 445 SMB TCP 49152 to 65535 RPC dynamic ports
-
-
Forward and reverse lookup should be enabled in DNS for machine discovery;
-
The eG agent installer requires a Domain Administrator or equivalent privilege for installing the eG agent remotely;
-
The eG agent installers (provided as Zip files for Windows and tar.gz files for Linux) should be available in the following location on the eG manager host: : <EG_MANAGER_INSTALL_DIR>\manager\agents\Installer
Once the aforesaid pre-requisites are fulfilled, proceed to automate agent installation. For this, do the following:
-
Login to the SaaS manager as a tenant with OrgAdmin rights.
-
In the eG management console, navigate to the page using which an eG agent can be downloaded. If you want to install the agent installer on a Windows host, then select ZIP/TAR Package as the Installation Method, pick Windows as the Operating System, and click on the Download Agent Installer button in this page (see Figure 1) to download the installer.
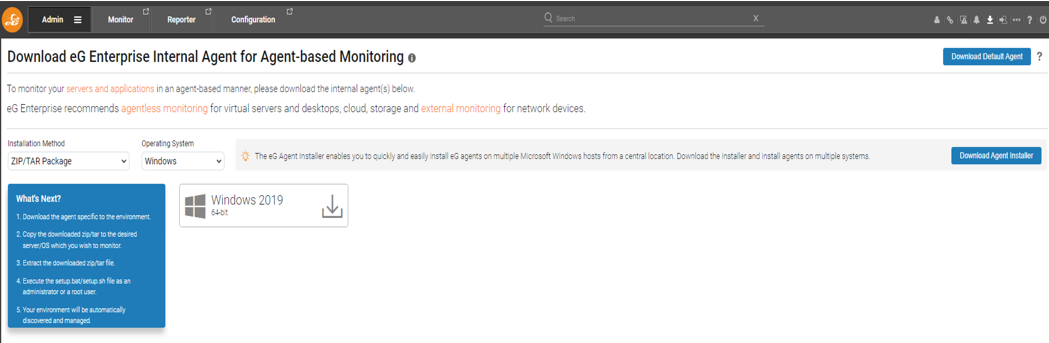
- In this case, a zip file named eG_Agent_Installer will get downloaded to the location you specify. Unzip the file and run the eG_Agent_Installer application as an administrator. to launch the installer.
-
Alternatively, you can execute a proprietary PowerShell script (on Windows) or a Shell script (on a Linux host) that eG provides to deploy the installer on a Windows or a Linux host (as the case may be).
To use the PowerShell script for deploying the agent installer on a Windows host, follow the steps below:
-
In Figure 2, set Command Line as the Installation Method.
-
Then, pick Windows as the Operating System.
-
Next, pick the Windows version and bit-rate from the Environment drop-down. The PowerShell script that corresponds to your specification will then be displayed, as depicted by Figure 2.
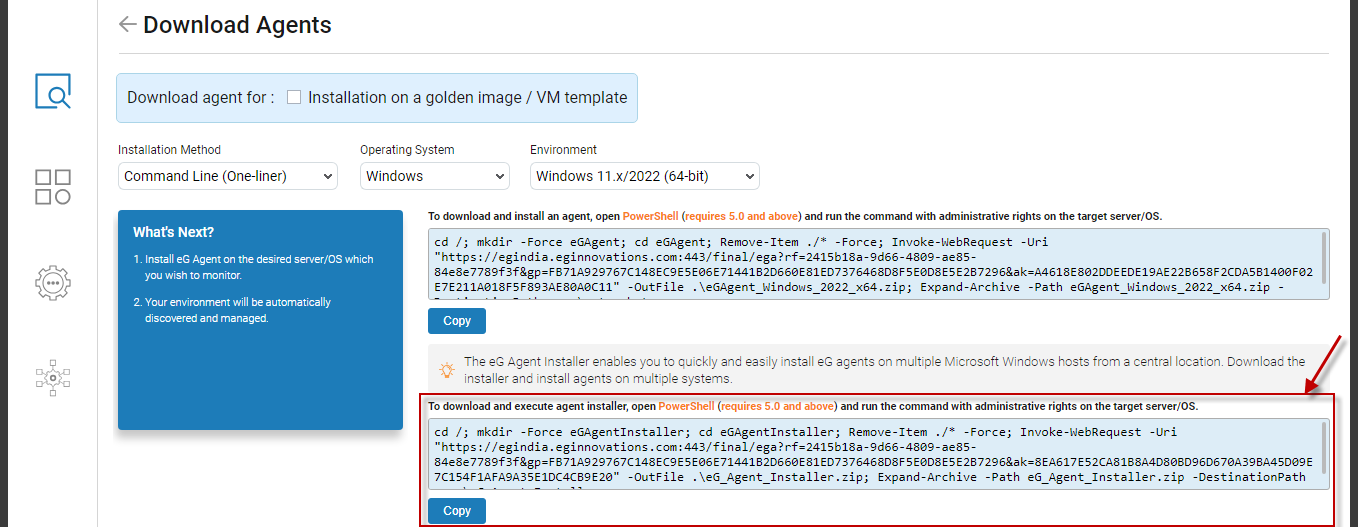
Figure 2 : Installing an eG agent installer on a Windows host using the PowerShell script provided by eG
-
Click on the Copy button below the script to copy the script to the clipboard.
-
Next, open the PowerShell prompt on the target host, paste the script therein, and run it as an administrator.
-
The script, upon execution, will automatically install and start the eG agent installer.
Note:
Before attempting to use the Command line option for deploying the agent installer on a Windows host, make sure that PowerShell v5,0 (or above) exists on the target host.
To install the eG agent installer on Linux using the eG-provided command, do the following:
-
In Figure 3, set Command Line as the Installation Method.
- Then, pick Linux as the Operating System.
-
Next, pick the Linux version and bit-rate from the Environment drop-down. The command that corresponds to your specification will then be displayed, as depicted by Figure 3.
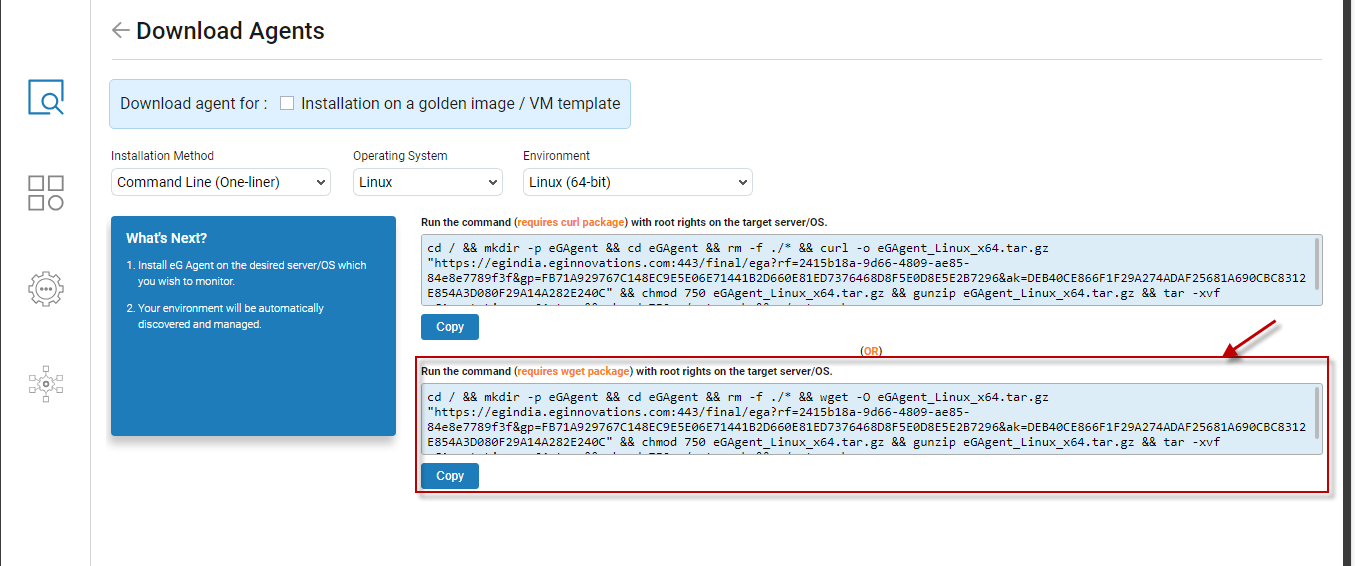
Figure 3 : Installing the eG agent installer on a Linux host by running a command on the target host
-
Click on the Copy button below the command to copy it to the clipboard.
-
Next, open the Shell prompt on the target host, paste the command therein, and run it with root user privileges.
-
The command, upon execution, will automatically install the eG agent installer on the target host and launch it.
Note:
Before attempting to use the Command line option for deploying the agent installer on a Linux host, make sure that wget package exists on the target host.
-
-
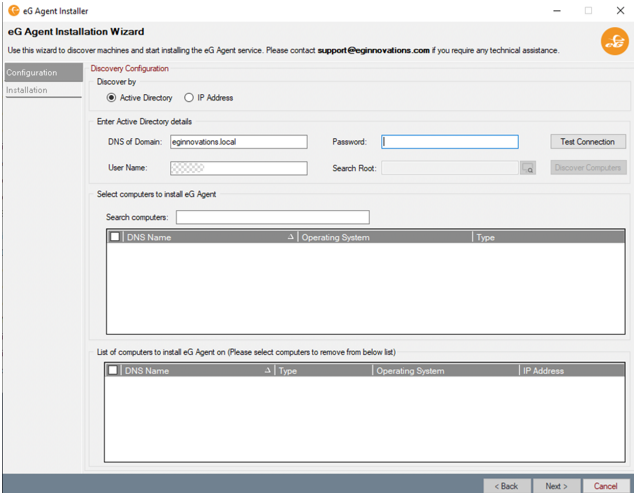
Once the agent installer starts, the eG Agent Installation Wizard (see Figure 4) opens. The Configuration tab page will open by default. Using this tab page, you can discover the probable targets for agent installation from your environment, and begin installing the agent on each of them.
-
You can discover the target hosts for agent deployment, using one of the following options:
-
In case of large / medium-sized SaaS installations, comprising of numerous hosts, it is near-impossible to know the IP addresses/host names of all the hosts in a domain. In such situations, it is best to integrate the agent installer with the Active Directory server in the environment, so that all the hosts in a given domain can be automatically discovered.
-
Sometimes, you may want only a handful of hosts in your SaaS deployment to be managed by eG. If you know the exact IP addresses of these targets, or at least know which IP address range they fall within, you can configure the agent installer with the details you know. The installer then performs a simple IP address-based discovery, and discovers the hosts you want to install agents on.
The procedure for agent installation changes according to the mode of discovery you choose here - whether Active Directory-based discovery? or IP address-based discovery. The sections that follow will discuss each of these procedures separately.
Performing Active Directory-based Discovery of Target Hosts
If you want to use the Active Directory server, first pick the Active Directory option from the Discover by section (see Figure 4), and proceed as follows:
-
As soon as the Active Directory option is chosen, eG automatically identifies the domain to which the Windows system hosting the agent installer, belongs. The DNS name of this domain is by default displayed against DNS of Domain. If you want, you can change the DNS name.
-
Similarly, the User Name text box will, by default, display the name of the domain user who is currently logged into the Windows system where the wizard is running. You should change this User Name to that of the Domain Administrator. This is because, without Domain Administrator privileges, the agent installer cannot discover hosts in the domain and install agents on them.
-
After changing the User Name, specify the password of the Domain Administrator in the Password text box.
-
Then, click on Test Connection to see if the installer is able to connect to AD and validate the user credentials.
-
If the test does not throw any errors, proceed to find the machines on which agents are to be installed. For that, click on Search Root. Doing so will automatically discover the Organizational Units (OUs) in the domain and display them for selection (see Figure 5).
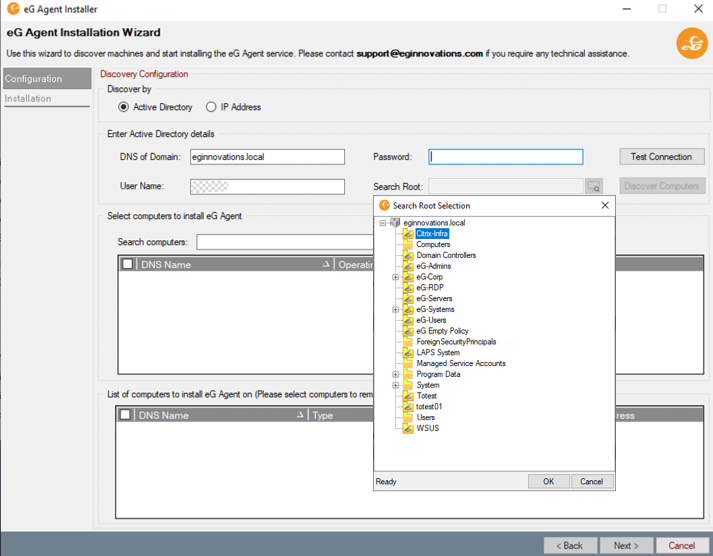
-
Next, select the OU that contains the target hosts of interest to you. For that, select the check box before that OU. Then, click the Discover Computers button indicated by Figure 6.
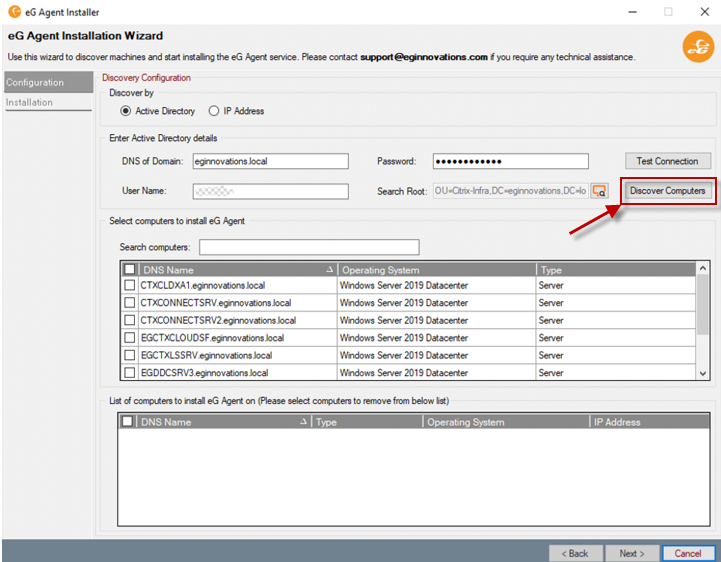
-
The machines in the chosen OU will then be displayed in the Select computers to install eG Agent list box (see Figure 6). From this list box, select the hosts on which you want to install agents.

Figure 7 : Selecting the hosts on which agents are to be installed
-
Every time you select a host from the 'Select computers....' list box, your selection will get added to the List of computers to install eG Agent on list box below it. If you decide not to install eG agents on any of the hosts you previously selected, then you can exclude these hosts from the list of probable targets. For that, select the hosts to be excluded from the 'List of computers. . .' list box in Figure 7.
-
Then, click the Next button in Figure 7. As soon as this is done, you will automatically switch to the Installation tab page (see Figure 8). The hosts chosen for agent installation will be displayed herein. If you want, you can choose to install agents on only a few hosts at a time, and not all of them. To achieve this, from the Select computers to verify prerequisites and then install eG Agent list box, select the hosts that you want to install agents on now.
If too many hosts are available for selection in the 'Select computers to verify. . .' list box, you can optionally use the Search computers text box to quickly locate the hosts of interest to you. You can either specify the whole / a part of the name of the host in this text box, or use wild card patterns. The hosts that match your search condition will then be displayed in the 'Search computers to verify...' list box. You can then proceed to select the targets for agent installation from the filtered list.
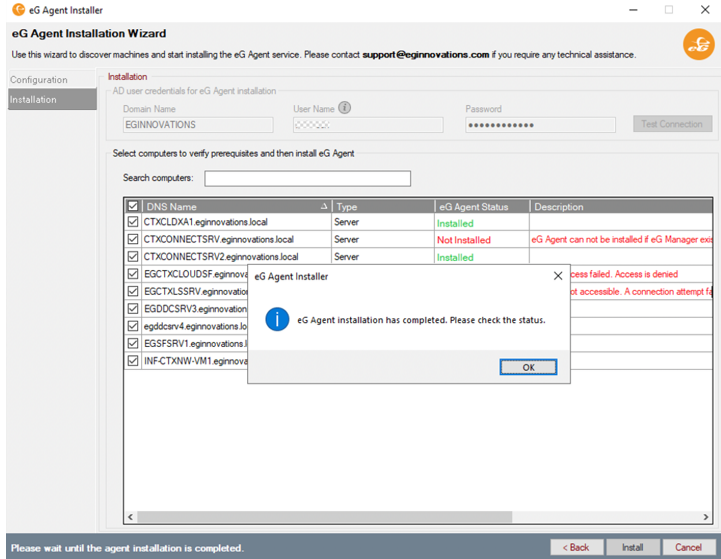
Figure 8 : Installing eG agents on chosen targets and viewing the status of the installation
-
Once the list of targets is crystallized, click on the Install button in Figure 8 to trigger the agent deployment. Once the installation procedure ends on all the targets chosen, a message box displaying a message to that effect will appear (see Figure 8). The eG Agent Status column in the 'Select computers to verify...' list box will clearly indicate the status of the agent installation on each of the chosen hosts. If the installation failed on any host, then look up the Description column to determine the reason for the failure.
-
Performing IP Address-based Discovery of Target Hosts
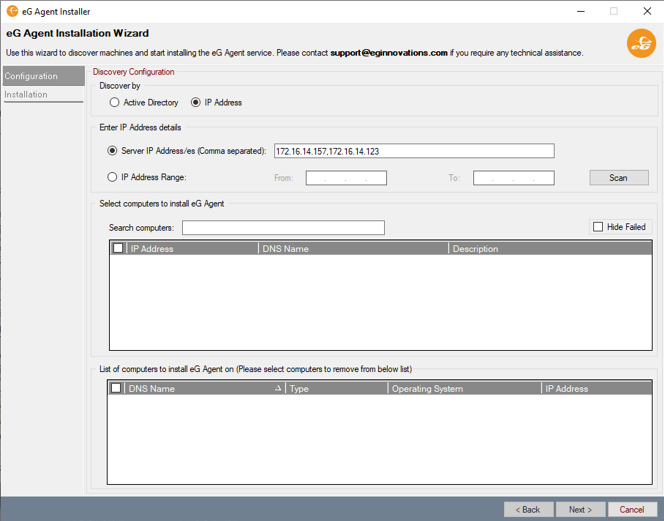
If you want to select the target hosts by explicitly specifying their IP addresses (and not via Active Directory), first choose the IP Address option from the Discover by section (see Figure 4), and proceed as follows:
-
Figure 9 will appear. In the Enter IP Address details section of Figure 9, indicate whether you want to specify a single/comma-separated list of IP addresses, or an IP address range. In the case of the former, select the Server IP Address/es option. Then, specify the IP address of the target host in the adjoining text box. If you want to install agents on multiple target hosts, provide multiple IP addresses here as a comma-separated list.
-
On the other hand, if you want to provide a range of IP addresses, select the IP Address Range option from the Enter IP Address details section of Figure 9. Then, specify the IP address that range starts with and ends with in the From and To text boxes, respectively.
-
Then, click on the Scan button. The agent installer will then start scanning the environment for the specified IP addresses.
-
If hosts are found in environment with the specified IP addresses, or within the configured IP address range, then the hosts so discovered will be listed in the Select computers to install eG Agent list box (see Figure 10). From this list box, select the hosts on which you want to install agents.
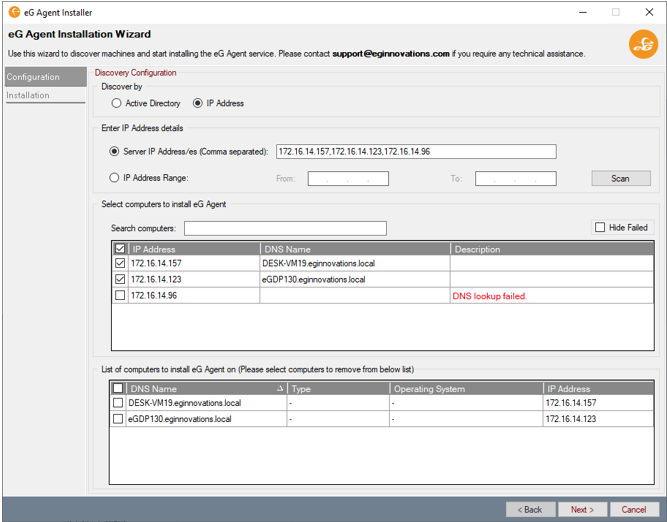
Figure 10 : Viewing the hosts with the specified IP addresses or within the configured IP range
-
Every time you select a host from the 'Select computers....' list box, your selection will get added to the List of computers to install eG Agent on list box below it. If you decide not to install eG agents on any of the hosts you previously selected, then you can exclude these hosts from the list of probable targets. For that, select the hosts to be excluded from the 'List of computers. . .' list box in Figure 10.
-
Then, click the Next button in Figure 10. As soon as this is done, you will automatically switch to the Installation tab page (see Figure 11). Using this tab page, you can grant Domain Administrator privileges to the agent installer, so that it can install agents on the targets, remotely. For this, specify the User Name and Password of the domain administrator in Figure 11. Note that the agent installer will automatically discover the domain to which its host belongs and displays the DNS name of that domain in the Domain Nametext box of Figure 11.
Figure 11 : Installing eG agents on chosen targets and viewing the status of the installation
-
You will also find that the hosts you had chosen for agent installation in Figure 10 are displayed in Figure 11 as well. If you want, you can choose to install agents on only a few hosts at a time, and not all of them. To achieve this, from the Select computers to verify prerequisites and then install eG Agent list box, select the hosts that you want to install agents on now.
-
If too many hosts are available for selection in the 'Select computers to verify. . .' list box, you can optionally use the Search computers text box to quickly locate the hosts of interest to you. You can either specify the whole /a part of the name of the host in this text box, or use wild card patterns. The hosts that match your search condition will then be displayed in the 'Search computers to verify...' list box. You can then proceed to select the targets for agent installation from the filtered list.
-
Once the list of targets is crystallized, click on the Install button in Figure 11 to trigger the agent deployment. Once the installation procedure ends on all the targets chosen, a message box displaying a message to that effect will appear (see Figure 11). The eG Agent Status column in the 'Select computers to verify...' list box will clearly indicate the status of the agent installation on each of the chosen hosts. If the installation failed on any host, then look up the Description column to determine the reason for the failure.
