
Integrating with Autotask
Autotask provides a complete IT business management solution that combines Service Desk, CRM, Projects, Time & Expense, Billing and more.
To ensure that the eG manager integrates with the Service Desk module of Autotask via its web services API, do the following:
- Login to the eG administrative interface.
-
Select the Manager option from the Settings tile.
-
Figure 1 will then appear. From the manager settings tree in the left panel of Figure 1, select the ITSM/Collaboration Integration node. The third-party ITSM/Collaboration tools that eG Enterprise can integrate with will be listed in the right panel.

-
Now, click on the Autotaskoption in the right panel (see Figure 1). An Autotask section will now appear in the right panel (see Figure 2).
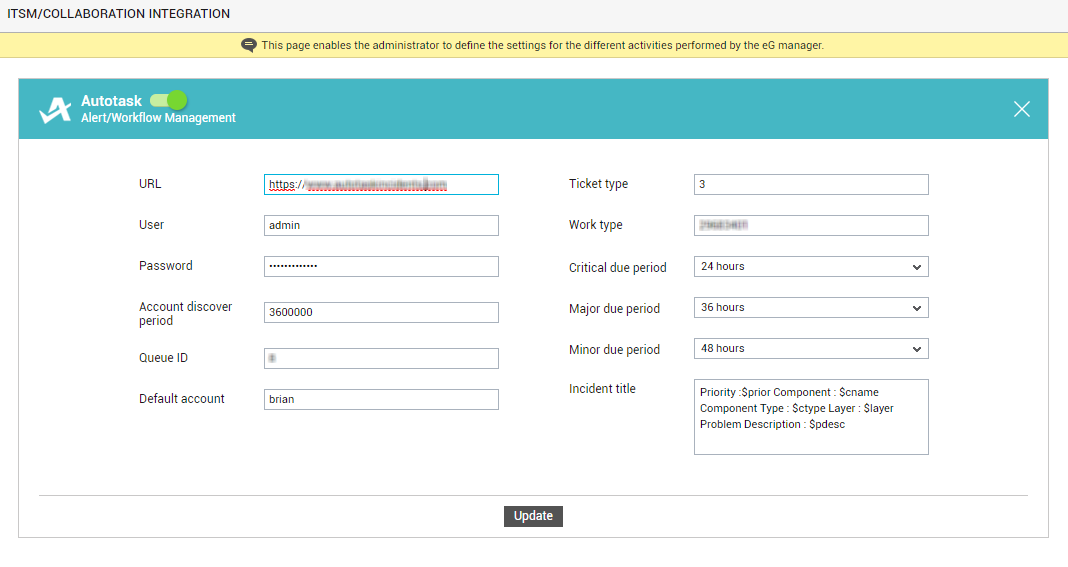
- To enable integration with Autotask, first slide the Autotask slider in Figure 2 to the right.
- Then, specify the URL using which the eG manager should connect to Autotask.
-
Next, against User and Password, provide the credentials of a valid user who has rights to access Autotask.
-
Then, in the Account discover period text box, enter how frequently the eG manager needs to auto-discover the user accounts configured in Autotask. By default, this is set to 3600000 millisecs. If an auto-discovered user account is mapped to one/more zones configured in eG, then Autotask will automatically assign the trouble related to the servers in those zones, to the corresponding user account. To map an auto-discovered user account with one/more zones, do the following:
- Open the eg_services.ini file in the <EG_INSTALL_DIR>\manager\config directory, using an editor.
-
Typically, when user accounts are auto-discovered for the first time from Autotask, the eG manager automatically creates a section named [autotask_account_mapping] in the eg_services.ini file. All auto-discovered user accounts are inserted as entries in this section, in the following format:
[AUTOTASK_ACCOUNT_MAPPING]
<AccountName1>$@$<AccountNumber1>=
<AccountName2>$@$<AccountNumber2>=
. . .
. . .
<AccountNameN>$@$<AccountNumberN>=
To map a user account to one/more zones, just configure a comma-separated list of zones against the corresponding <AccountName1>$@$<AccountNumber1> entry in the [autotask_account_mapping] section, as shown below
[AUTOTASK_ACCOUNT_MAPPING]
<AccountName1>$@$<AccountNumber1>=east_coast_zone,zone_singapore,zone_london
- Finally, save the eg_services.ini file.
- In QueueID, specify the ID of the queue to which eG alarms are to be assigned. By default, 8 is the queue to which all eG alarms are assigned.
- Against Default account, indicate to which user account eG alarms are to be assigned by default. If a server on which eG has raised an alarm does not belong to any zone or any zone that is mapped to a user account, then such an alarm will be automatically assigned to the default user account. Likewise, if auto-discovered user accounts are not mapped to any zones configured in eG, then all eG alarms will be automatically assigned to the default user account.
- In the Ticket type text box, indicate the type of ticket that is to be raised in Autotask for every eG alarm that the eG manager sends to it. By default, this parameter is set to 3, which indicates that for eG alarms tickets of type, Problem, are generated by default in Autotask. You can change the value of this parameter to 1 to indicate Service request or 2 to indicate Incident.
- In the Work type text box, specify the work type to be assigned to the trouble tickets generated for the eG alarms. By default, this is 29683401.
- Next, specify the Critical due period. This is the time (in millisecs) by which tickets of a Critical priority will be resolved.
- Then, indicate the Major due period, which is the time (in millisecs) by which tickets of a Major priority will be resolved.
-
Likewise, enter the Minor due period. This is the time (in millisecs) by which tickets of a Minor priority will be resolved.
-
Next, against Incident title, specify the format in which the title of the trouble ticket is to be displayed in the Autotask console. The default format is as follows:
Priority :$prior Component : $cname Component Type : $ctype Layer : $layer Problem Description : $pdesc
The text preceding the ‘:’ (colon) in the format above indicates what information follows. The ‘dollared’ ($) text that follows the ‘:’ (colon) is a variable, the value of which varies at run time, depending upon the eG alarms. For example, in the default format above, Priority is a label that indicates that the information that follows the ‘:’ is the priority of the alarm. The variable $prior that succeeds the ‘:’ represents the alarm priority, and changes according to the priority of the actual alarm that is sent by the eG manager to Autotask. While you can change the labels, you are advised against changing any of the variable names.
The other variables that are part of the default format are discussed in the table below:
$cname
Will display the name of the problem component
$ctype
Will display the component type to which the problem component belongs
$layer
Will display the layer affected by the problem
$pdesc
Will display a brief problem description
So, if a Critical alarm raised by the eG manager for a high CPU usage problem detected in the Operating System layer of the Windows server, 192.168.10.15, is routed to Autotask, the web services API of Autotask will convert the alarm into a trouble ticket titled (by default) as follows:
Priority:Critical Component:192.168.10.15 Component Type:Windows Layer:Operating System Problem Description:High CPU usage
- Finally, click the Update button in Figure 2.
