
Integrating with Salesforce
Salesforce is a single, integrated customer relationship management (CRM) platform. which unites marketing, sales, commerce, service, and IT teams from anywhere, to ensure complete customer satisfaction.
Service Cloud is Salesforce's customer service application. Support agents gather complaints from customers, register them as 'cases' in Service Cloud, and thus track the resolution of issues.
eG Enterprise integrates with Salesforce's Service Cloud via REST API. eG alerts are automatically routed to Service Cloud, thus resulting in automatic registration of cases with Service Cloud. Every time an eG alert is modified/resolved, the corresponding case in Service Cloud is also updated or closed (as the case may be).
To integrate the eG manager with Salesforce's Service Cloud, the following pre-requisites need to be fulfilled:
-
Create a New Connected App in Salesforce to enable the eG manager to connect to Salesforce, and obtain the Consumer Key and Consumer Secret of the new app;
-
Relax the IP restrictions of the new connected app
These requirements have been discussed below, followed by the procedure to integrate eG manager with Salesforce.
Creating a New Connected App
A connected app is a primary means by which the eG manager connects to Salesforce. To create a new connected app, do the following:
-
Login to your Salesforce account.
-
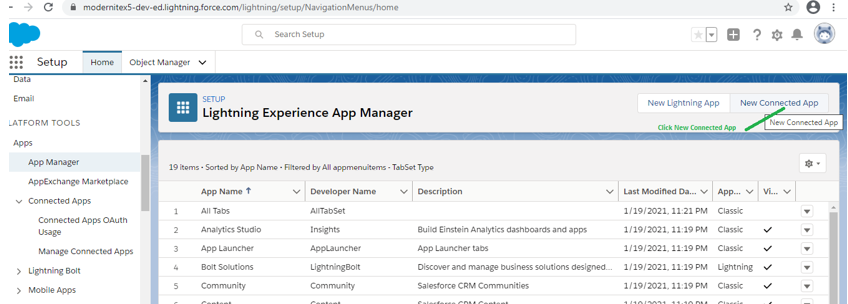
When Figure 11 appears, browse the options in the left panel of Figure 1, and locate the PLATFORM TOOLS section. Expand the Apps option below PLATFORM TOOLS and select the App Manager option beneath. The right panel will then change as depicted by Figure 11. Click on the New Connected App button in the right panel to begin creating a new app for the eG manager.
-
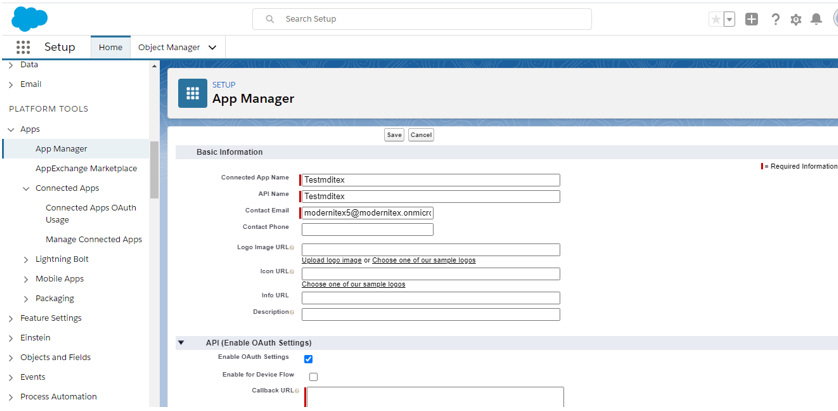
Figure 12 will then appear. Assign a unique name to the new app against Connected App Name. Make sure that all details marked as 'Required' are duly provided in the Basic Information section of Figure 12.
-
Next, in the API section of Figure 12, Enable OAuth Settings by selecting the corresponding check box. Next, specify https://localhost as the Callback URL. A callback URL is the URL that is invoked after OAuth authorization for the consumer (connected app).
-
Then, proceed to grant the required permissions for the new connected app. For this, from the Available OAuth Scopes list box (in Figure 13), select the following scopes/permissions:
-
Access and manage your Chatter data (chatter_api)
-
Access and manage your data (api)
-
Full access (full)
To grant these permissions to the new app, click on the Add arrow button adjacent to the Available OAuth Scopes list box in Figure 13. Your selection will then appear in the Selected OAuth Scopes list box.
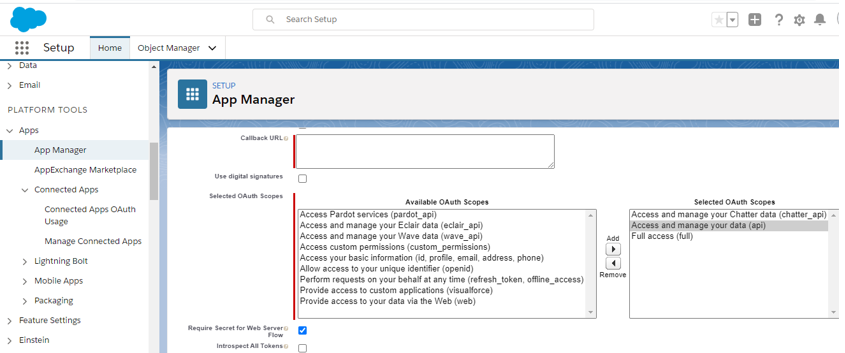
Figure 13 : Assigning OAuth permissions to the new connected app
-
-
Finally, save the app's specifications by clicking on the Save button at the top of Figure 12.
-
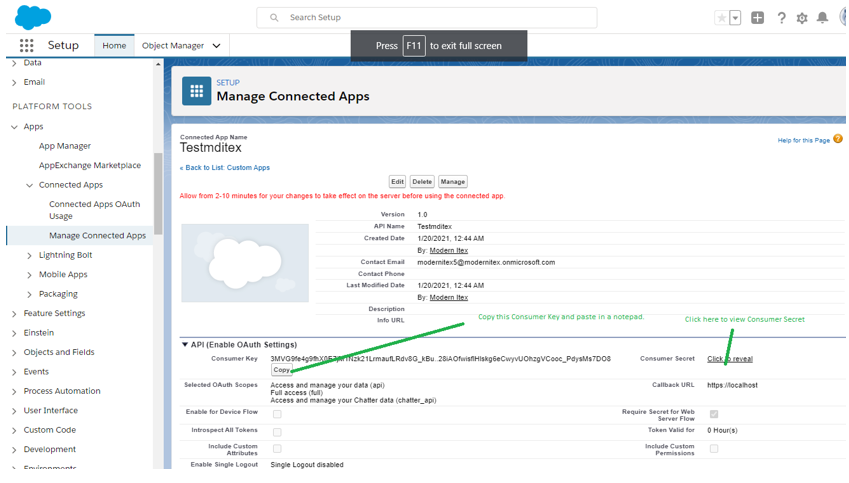
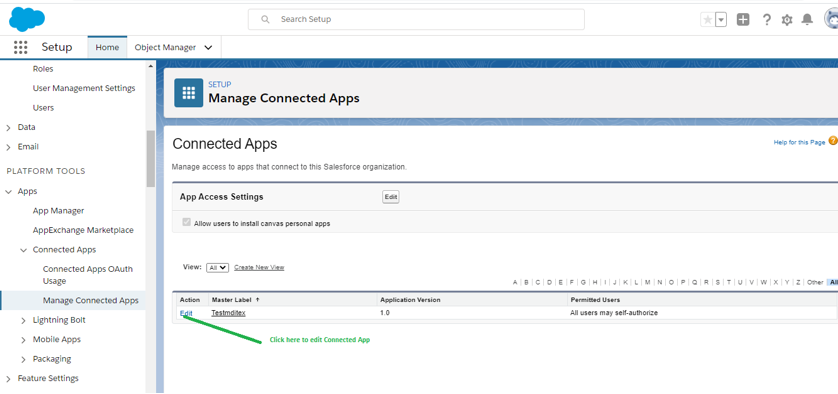
For the changes to take effect, it will typically take 2-10 minutes. After that, the new Connected App will be fully created. To review the details of the new app, first expand the Connected Apps option under the Apps option (below PLATFORM TOOLS) in the right panel of Figure 14. Then, select the Manage Connected Apps option. The right panel will then change to display the details of the new app (see Figure 14).
-
Once you confirm that all details are correct, you must make a note of the Consumer Key indicated by Figure 14. Consumer refers to the connected app that uses OAuth to authorize both the Salesforce user and itself on the user’s behalf. A consumer uses a key to identify itself to Salesforce. In our case, eG manager is the connected app, and the Consumer Key displayed in Figure 14 is the ID using which the eG manager application connects to Salesforce. A consumer uses a secret to establish ownership of the consumer key. To determine the Consumer Secret of the eG manager app, click on the Click to reveal link indicated by Figure 14. Once the Consumer Secret is revealed, make a note of it.
Relaxing the IP restrictions of the New Connected App
Now that the Connected App is created, proceed to relax the IP restrictions for that app. This should be done, so that the eG manager can interact with Salesforce regardless of which IP address the manager is hosted on.
To achieve this, do the following:
-
Login to your Salesforce account.
-
When the Home Page appears, browse the options in the left panel of Figure 11, and locate the PLATFORM TOOLS section. Expand the Apps option below PLATFORM TOOLS, and then expand the Connected Apps option, and select the Manage Connected Apps option beneath. The right panel will then change as depicted by Figure 15.
-
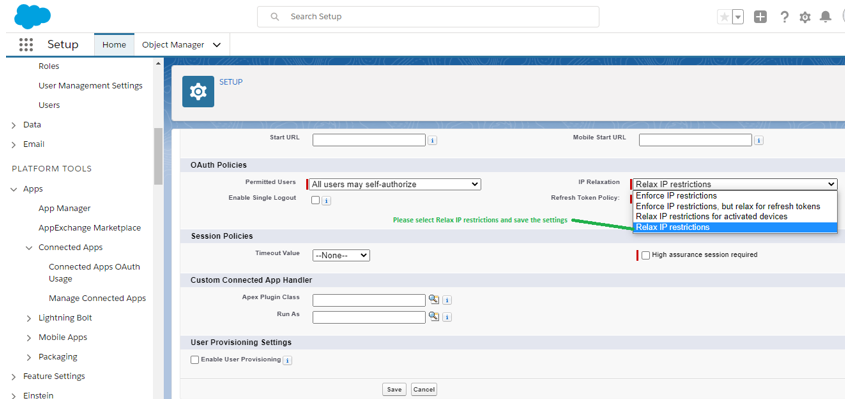
In the list of connected apps, locate the app you created for the eG manager. Click on the Edit link alongside the app (as indicated by Figure 15). Figure 16 will then appear.
-
From the IP Relaxation drop-down in the OAuth Policies section of Figure 16, select the Relax IP restrictions option. Finally, click the Save button in Figure 16 to save the changed settings.
Steps for Integrating with eG Enterprise with Salesforce
To achieve this, follow the procedure below:
- Login to the eG administrative interface.
-
Select the Manager option from the Settings tile.
-
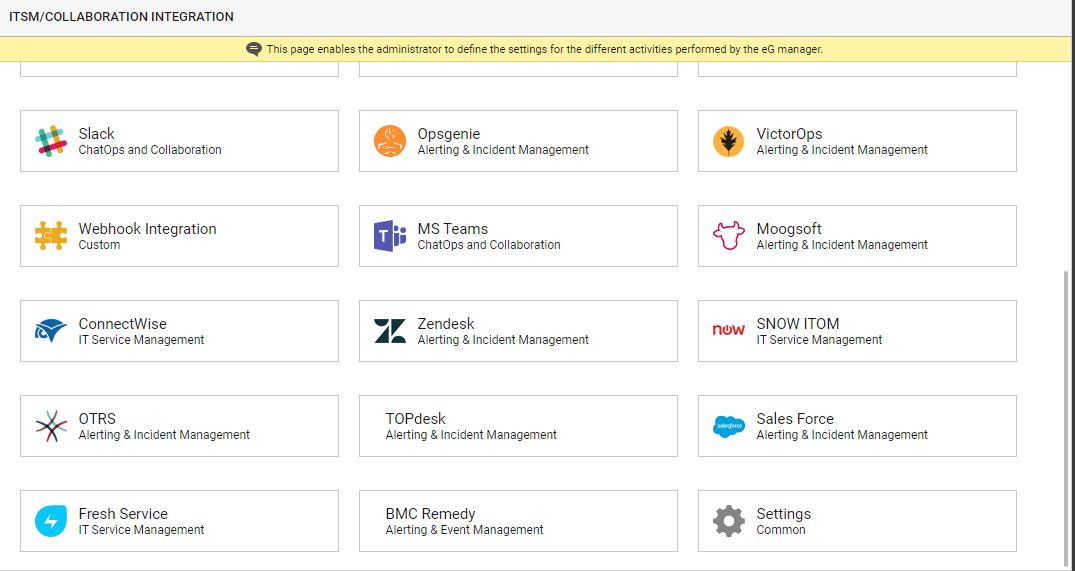
Figure 17 will then appear. From the manager settings tree in the left panel of Figure 17, select the ITSM/Collaboration Integration node. The third-party ITSM/Collaboration tools that eG Enterprise can integrate with will be listed in the right panel.
-
Now, click on the Sales Forceoption in the right panel (see Figure 17). A Sales Force section will now appear in the right panel (see Figure 18).
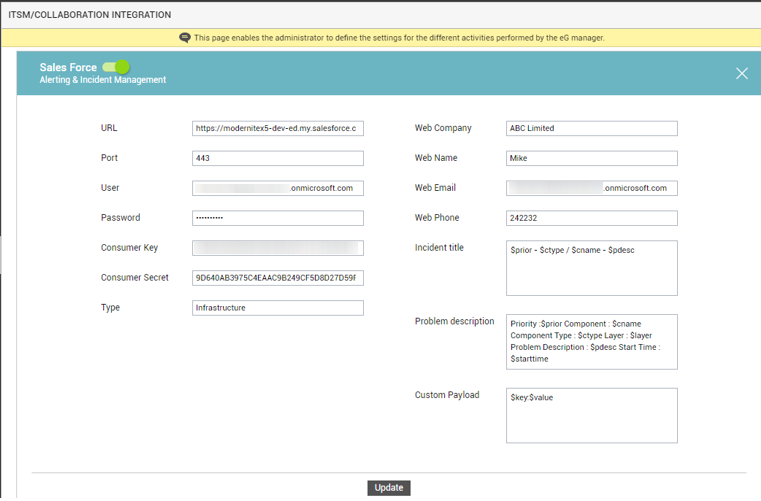
- To enable integration with Salesforce, first slide the Sales Force slider in Figure 18 to the right.
-
Then, specify the following in Figure 18:
- URL: eG Enterprise integrates with Salesforce using REST API. The eG manager POSTs eG alerts to the endpoint URL of the API as JSON payloads containing alert information. To enable the eG manager to connect to the API, you need to specify the endpoint URL here.
- Port: Specify the port via which the eG manager makes OAuth requests to Salesforce.
-
User name and Password: To integrate with Salesforce, the eG manager has to connect to Salesforce as a valid Salesforce user. Specify the credentials of such a user here.
- Consumer Key and Consumer Secret: Specify the consumer key and secret that you made a note of in step 8 of Creating a New Connected App.
- Type: Specify how to categorize all eG alerts routed to Salesforce.
- Web Company: Type the name of the company/entity from which the alerts/cases were reported. Provide a common entity name for all eG alerts.
- Web Name: Specify the name of the user who reported the issues/cases. All eG alerts that are automatically registered as cases in Salesforce will carry the same user name only.
- Web Email and Web Phone: Provide the contact information of the user who reported the issues/cases. All eG alerts that are automatically registered as cases in Salesforce will carry the same email and phone number only.
-
Incident Title: Specify the format in which the case titles for all eG alerts need to be displayed in Salesforce. The default format is:
$prior - $ctype / $cname - $pdesc
The ‘dollared’ ($) text in the format above is a key, the value of which varies at run time, depending upon the information contained in the eG alarms. For example, in the default format above, $prior is a key that represents the problem priority, and changes according to the severity of the eG alert that has been sent to Salesforce. You are advised against changing any of the key names.
The other keys that are part of the default format are discussed in the table below:
$ctype
Will display the name of the problematic component type
$cname
Will display the name of the problem component
$pdesc
Will display a brief problem description
-
Problem Description: Specify how problems are described in cases registered with Salesforce against alerts raised by eG Enterprise. The default problem description is as follows:
Priority : $prior Component Type : $ctype Component Name : $cname Layer : $layer Problem description : $pdesc Problem Start Time : $starttime Service : $service
The ‘dollared’ ($) text in the format above is a key, the value of which varies at run time, depending upon the information contained in the eG alarms. For example, in the default format above, $prior is a key that represents the priority/severity of an eG alert, and changes according to the actual priority of the eG alerts sent to Salesforce. You are advised against changing any of the key names.
The other keys that are part of the default format are discussed in the table below:
$cname
Will display the name of the problem component
$ctype
Will display the problem component type
$pdesc
Will display a brief problem description
$layer
Will display the problematic layer
$starttime
Will display the start time of the problem
$service
Will display the service ID.
-
Custom Payload: Use custom payload to customize the alert information you send to Salesforce, so that it includes additional static information.
Typically, the details of an eG alert are sent as a JSON file to the configured URL. Every piece of information contained within an eG alert - eg., priority, component name, component type etc. - is represented in the JSON file as a $key:$value pair, where 'key' denotes the alert field, and 'value' denotes the actual value of that field at run time. The 'key' is configured based on the keys supported by the Salesforce REST API. For instance, if the REST API represents alarm priorities using the key 'prior', then the same key will be used in the JSON file for denoting alarm priorities. Accordingly, the entry for alarm priority in the JSON file will be $prior:$value. The $value will be Critical, Major, Minor, or Normal, depending upon the actual priority of the alarm being sent.
First, check whether the Salesforce REST API supports a 'key' that can be used for capturing the 'source' of alerts/incidents. If no such key exists, then you cannot proceed with the Custom Payload configuration. On the other hand, if such a key is available, then proceed to replace the $key in your Custom Payload specification, with that key value. For the purpose of our example, let us assume that the REST API supports the key named 'source'. In this case therefore, substitute '$key' with 'source'.
Then, proceed to explicitly specify the FQDN of your eG manager in the place of $value. This is because, you can use the Custom Payload configuration to add only 'static' information - i.e., information that you explicitly configure, and hence will never change. In the case of our example therefore, the $value will be egmanager.innovations.com.
The complete Custom Payload specification will now be: source:egmanager.innovations.com
- Finally, click the Update button in Figure 18.
